
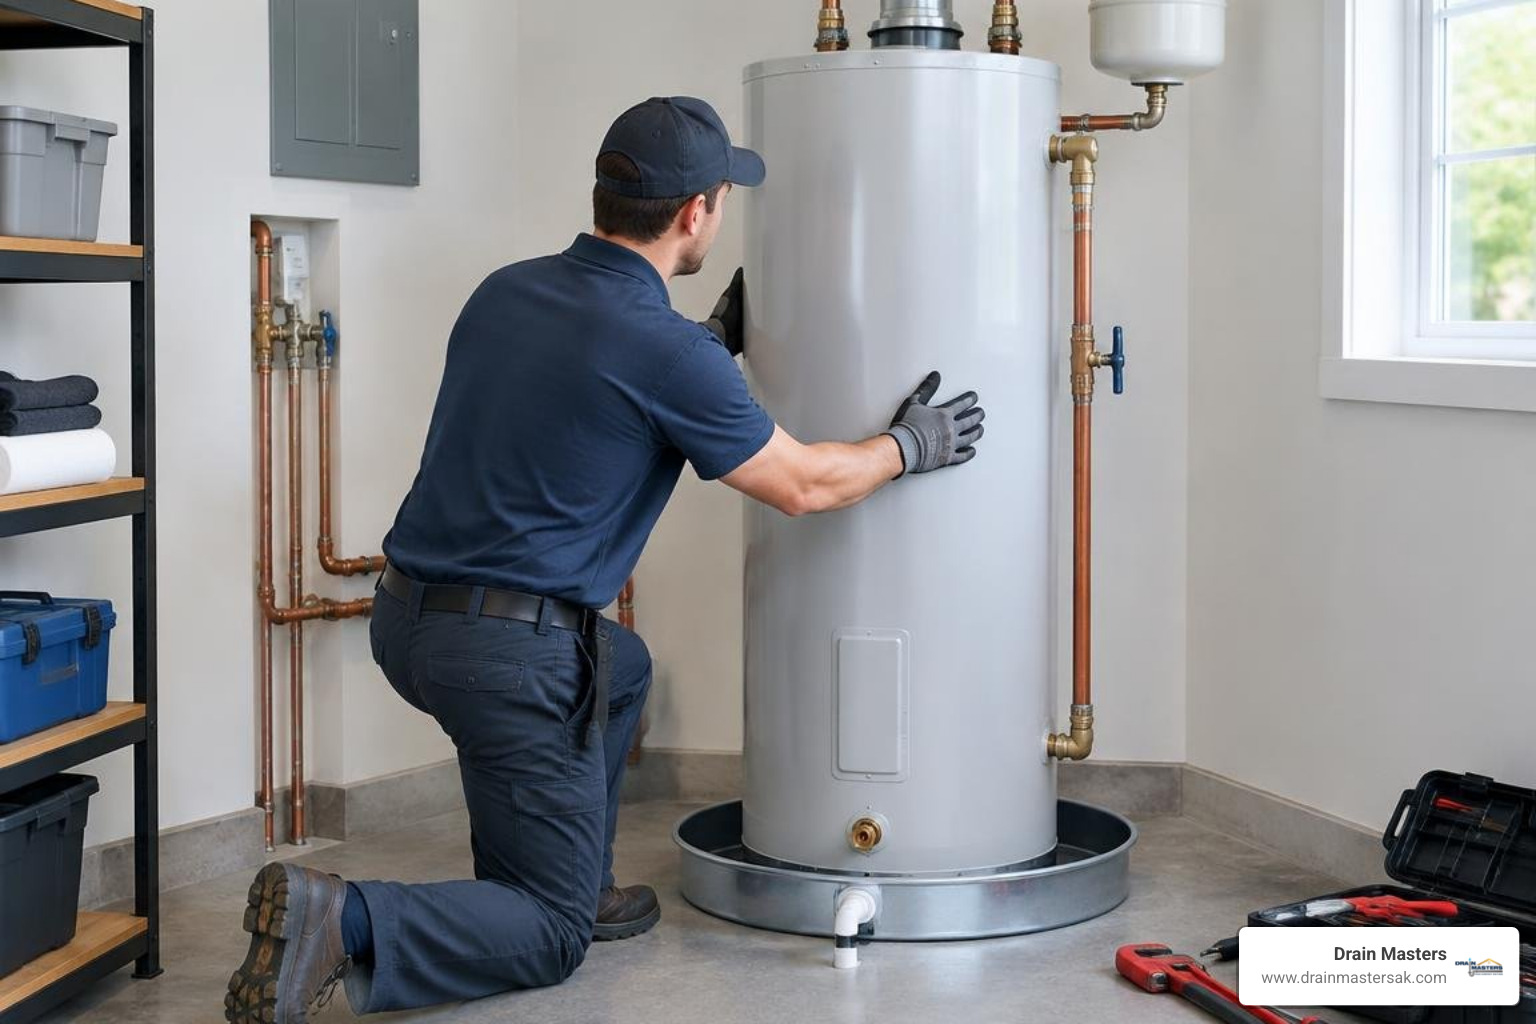
How to Change Out a Water Heater: What You Need to Know
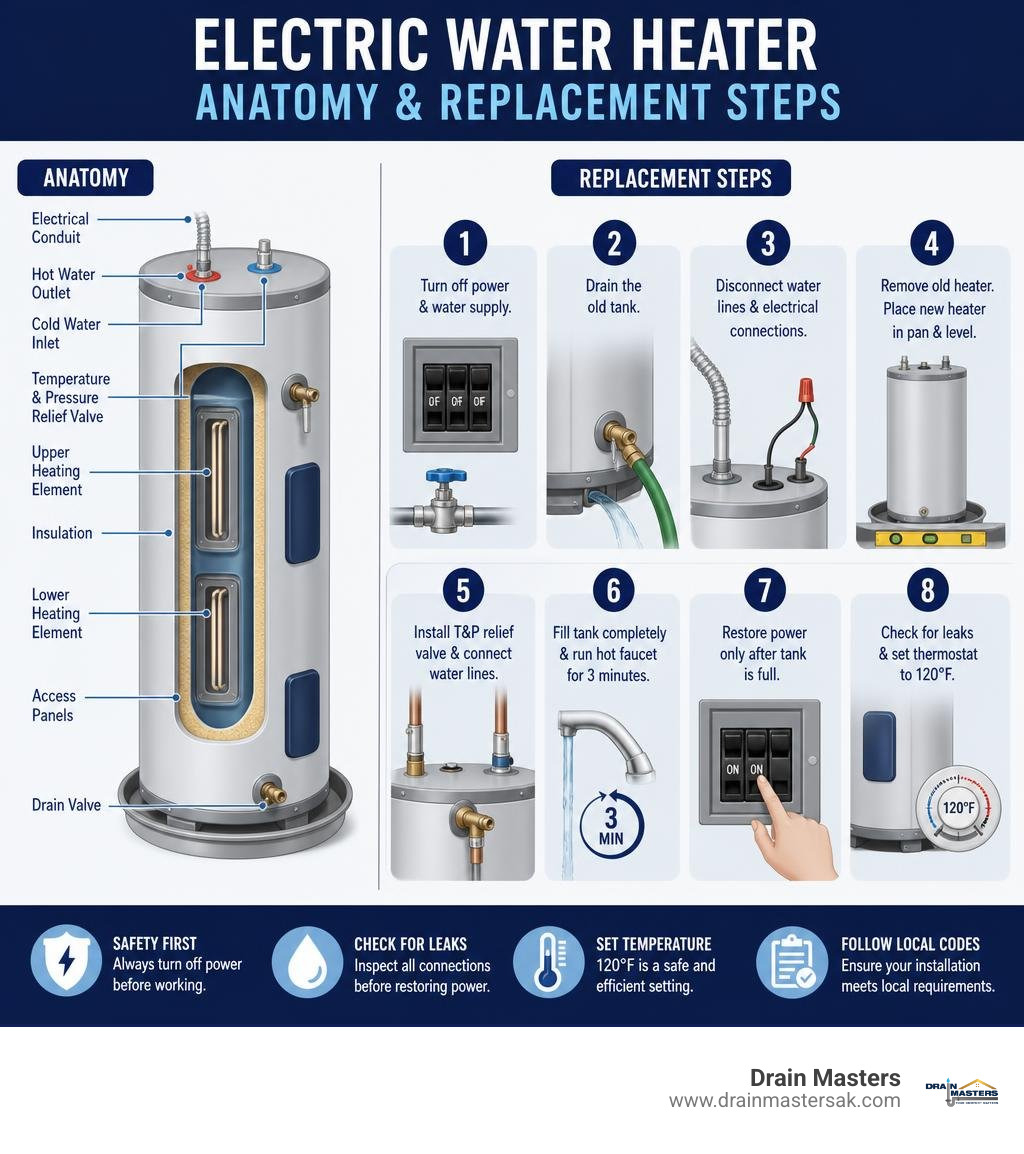
Ready to change out your water heater? Here is a quick overview of the process:
- Turn off the power at the circuit breaker and shut off the cold water supply.
- Drain the old tank using a garden hose connected to the drain valve.
- Disconnect the water lines and electrical connections from the old unit.
- Remove the old heater and position the new one in a drain pan, leveled with shims.
- Install the T&P relief valve and connect the water supply lines.
- Fill the tank completely and run a hot faucet for three minutes to purge air.
- Restore power only after the tank is fully filled to prevent dry firing.
- Check all connections for leaks and set the thermostat to 120 degrees Fahrenheit.
Water heating accounts for about 18% of your home’s total energy use, which makes it one of the most important systems in your house. Most tank-type water heaters last between 8 and 12 years. When one fails, it rarely picks a convenient moment. As the old saying goes, it almost always happens right after guests arrive for the week.
The good news is that changing out an electric water heater is a project many experienced DIYers can handle. A professional replacement typically runs into a significant investment depending on your location and setup, but doing it yourself can cut that cost significantly. That said, the job involves electricity, pressurized water, and local code requirements, so it pays to go in with a clear plan and a strong focus on safety.
With more than two decades of local experience, the Drain Masters team helps Anchorage, AK, homeowners change out water heaters safely and efficiently. This guide explains the process and when to call a professional.
Signs It Is Time for a Replacement
Living in a cold climate like Anchorage, AK, means we rely on our water heaters more than most. When your system starts to fail, you do not want to wait until you are greeted by an icy shock in the morning shower.
While some units can push past the 12-year mark, most conventional storage tanks are designed to last about 8 to 12 years. If your system is approaching or has passed this age threshold in July 2026, it is living on borrowed time.
Keep an eye out for these common warning signs:
- Visible Leaks and Drips: Water pooling around the base of the tank is a major red flag. This often indicates that the internal glass lining of the steel tank has fractured, allowing water to corrode the outer metal shell.
- Rusty or Discolored Water: If rusty water is only coming from your hot water taps, it is a strong indicator that the inside of your tank or your sacrificial anode rod has completely corroded.
- Rumbling and Banging Noises: As water is heated, sediment naturally settles to the bottom of the tank. Over time, this sediment hardens into a thick crust. When the heating elements fire up, water gets trapped beneath this scale, boiling and popping like popcorn. This localized overheating damages the tank floor and leads to premature failure.
- Fluctuating Temperatures: If your hot water runs out quickly or struggles to reach its target temperature, your heating elements may be failing, or sediment buildup may be blocking heat transfer.
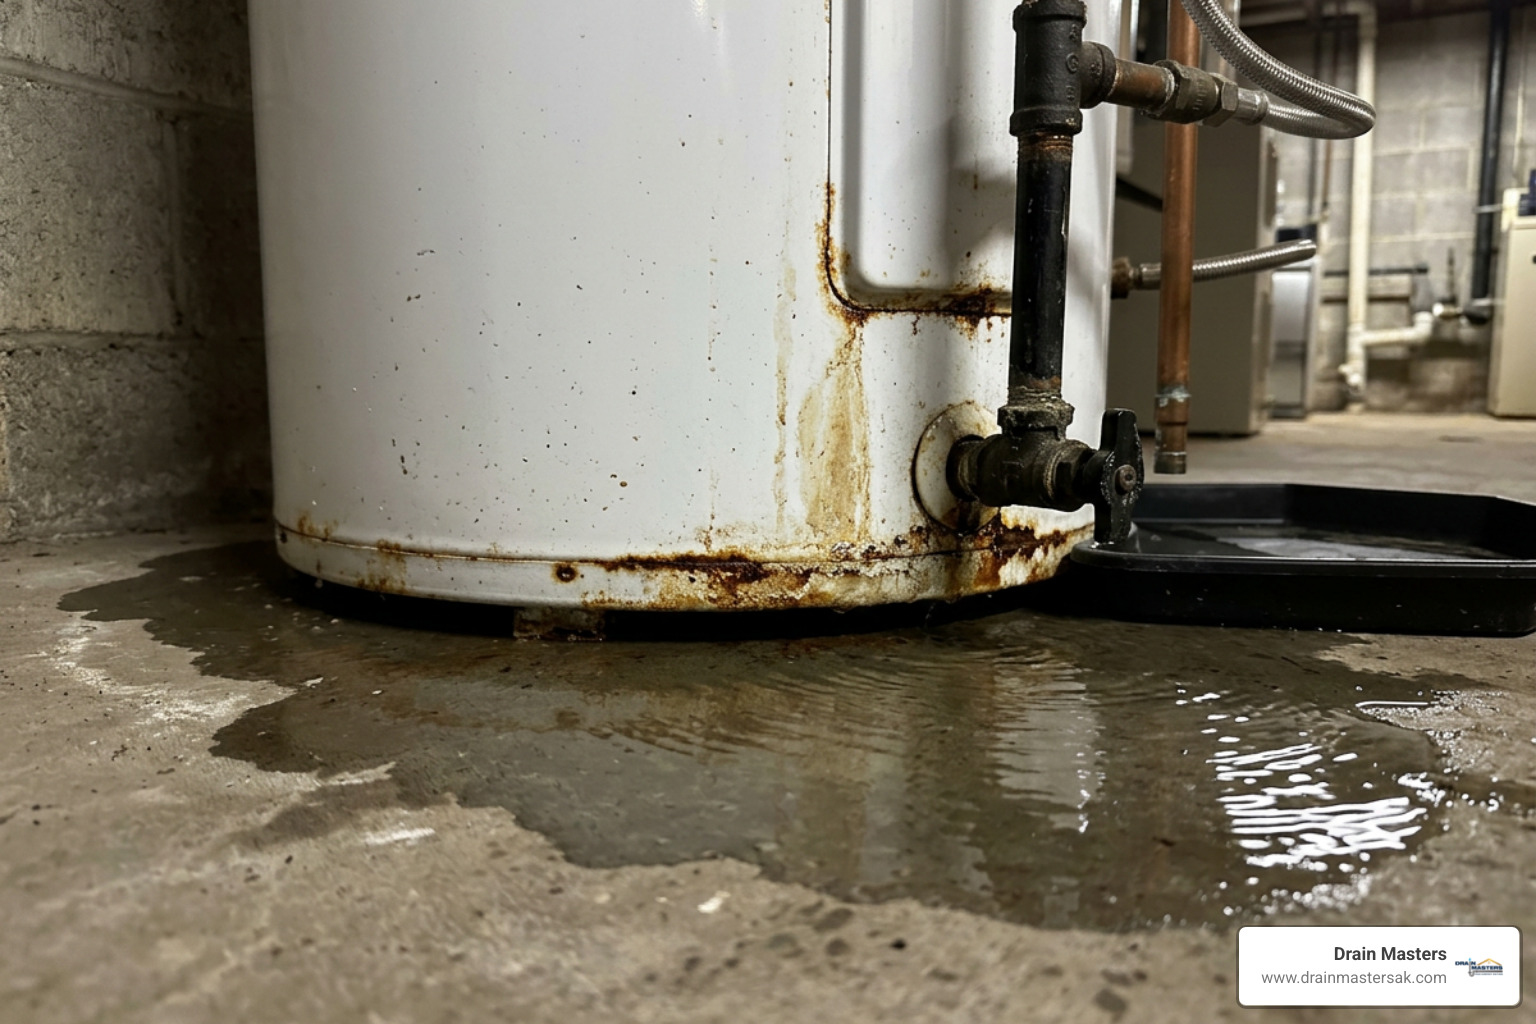
If you notice any of these symptoms, it is highly recommended to explore comprehensive water heater services in Anchorage to evaluate whether a repair or a complete replacement is the best path forward.
Step-by-Step Guide to Change Out Your Water Heater
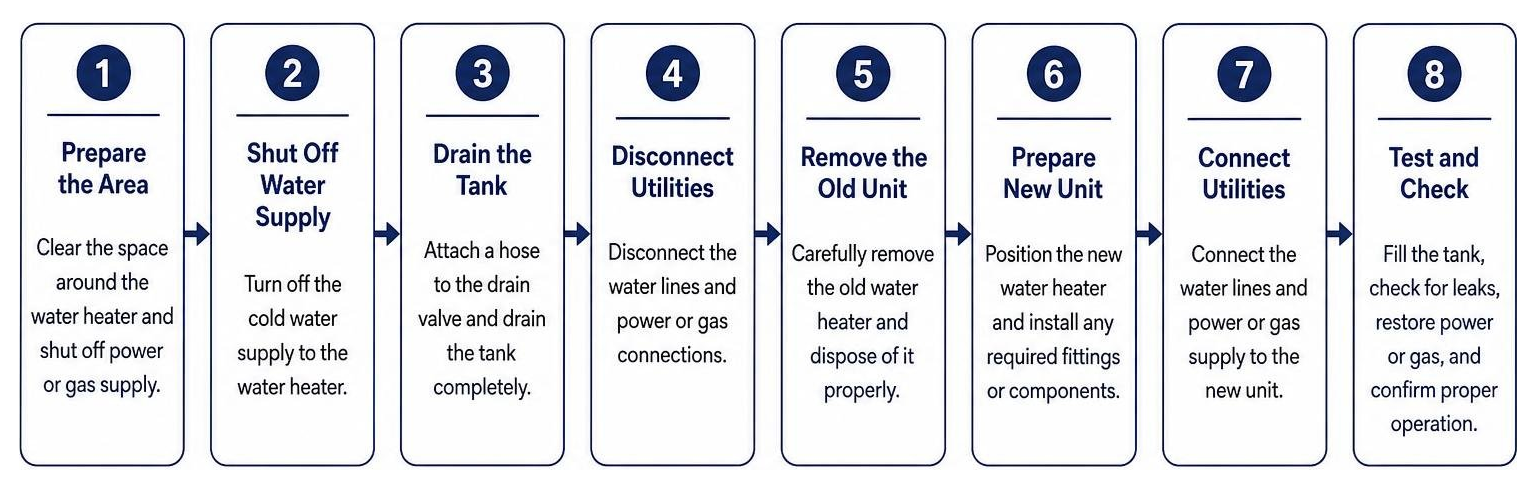
Replacing a water heater is a highly structured process. Taking shortcuts can lead to water damage, electrical hazards, or a ruined appliance. Below, we have broken down the entire physical swap into clear, chronological phases.
Before you begin, it is incredibly helpful to visualize the entire workflow.
Essential Tools and Materials to Change Out Your Water Heater
To ensure a smooth installation, gather all your tools and replacement materials before you turn off your utilities. Hunting for a missing fitting mid-project is a quick way to lose your momentum.
Required Tools:
- Non-contact voltage detector (essential for electrical safety)
- Pipe wrenches or large channel lock pliers
- Tubing cutter or hacksaw
- Screwdrivers (flathead and Phillips)
- Garden hose (long enough to reach a floor drain or outdoor area)
- Level and non-combustible shims
- Pipe deburring tool
Required Materials:
- A new electric water heater (sized appropriately for your home)
- A new Temperature and Pressure (T&P) relief valve (never reuse the old one!)
- Flexible braided stainless steel or corrugated water connectors
- Dielectric unions or dielectric nipples (to prevent galvanic corrosion between dissimilar metals)
- Teflon tape (plumber’s tape) and pipe joint compound (pipe dope)
- A plastic or metal drain pan (at least 2 inches wider than your new tank)
- Pipe insulation sleeves
For homeowners comparing conventional and indirect water-heating setups, how an indirect water heater tank works with a boiler offers useful context on storage and system compatibility.
Safety First: Preparing to Change Out Your Water Heater
Working with a 240-volt electrical appliance requires absolute caution. Do not rely on guesswork when dealing with electricity.
- Shut Off the Power: Locate your home’s main electrical panel. Find the double-pole circuit breaker labeled for the water heater (typically a 30-amp or 40-amp breaker) and switch it to the “OFF” position.
- Verify the Power is Off: Remove the metal junction box cover on top of the old water heater. Without touching the bare wires, place a non-contact voltage tester next to the electrical connections. The tester must confirm there is absolutely no electrical current flowing to the unit.
- Shut Off the Water Supply: Locate the cold water shut-off valve on the pipe leading into the top of the water heater. Turn it clockwise to shut off the incoming water supply. If the local valve is old or frozen, you may need to shut off your home’s main water supply.
- Relieve System Pressure: Open a hot water faucet on the highest floor of your home. This relieves the pressure built up inside the plumbing lines and will eventually break the vacuum inside the tank to allow it to drain smoothly.
If you open the junction box and find corroded wiring, or if you feel uncomfortable handling 240-volt circuits, it is always safest to contact a professional for professional water heater repair or replacement assistance.
Draining and Disconnecting the Old Unit
An empty 50-gallon water heater weighs roughly 120 to 150 pounds, but a full one weighs over 500 pounds. You must drain the tank completely before attempting to move it.
- Attach the Garden Hose: Screw a standard garden hose onto the drain valve located near the bottom of the water heater. Run the other end of the hose to a floor drain, a sump pit, or outdoors.
- Open the Drain Valve: Turn the drain valve counterclockwise to begin the draining process.
- Address Sediment Clogs: If the water only trickles out, sediment is likely blocking the valve. Carefully insert a small flathead screwdriver or a stiff wire into the valve opening to break up the sediment crust until water flows freely.
- Disconnect the Utilities: Once the tank is completely empty, disconnect the electrical wiring from the junction box, making sure to keep the ground wire intact. Next, use your pipe wrenches or tubing cutter to disconnect the hot and cold water supply lines. If the old pipes are hard-piped copper, cut them high enough to allow room for your new flexible connectors.
Positioning and Connecting the New Water Heater
Now that the old unit is out of the way, you can prepare the space for your new, energy-efficient model.
- Position the Drain Pan: Place your new drain pan on the floor where the heater will sit. If your water heater is located in an area where a leak could cause structural damage, ensure the pan has a dedicated drain line routed to a safe location.
- Set and Level the Tank: Use a helper or an appliance dolly to carefully lower the new water heater into the drain pan. Place a level on top of the tank. If it is uneven, slide non-combustible composite or metal shims under the base. A water heater that is off-level will create a low spot where sediment permanently accumulates, leading to premature tank failure.
- Install the T&P Relief Valve: Wrap the threads of your new Temperature and Pressure (T&P) relief valve with Teflon tape (wrapped clockwise at least three times) and apply pipe dope. Thread the valve into the designated opening on the side or top of the tank, tightening it with a wrench so the discharge opening points downward.
- Plumb the Discharge Pipe: Attach a copper or CPVC discharge pipe to the T&P valve. This pipe must run straight down, terminating no more than 6 inches (and no less than 2 inches) above the floor or drain pan. Never cap, plug, or reduce the size of this pipe.
- Connect the Water Supply Lines: Install dielectric nipples into the hot and cold ports on top of the heater to prevent galvanic corrosion. Connect your new flexible braided stainless steel connectors to these nipples, ensuring the cold supply line matches the cold inlet (marked in blue) and the hot supply line matches the hot outlet (marked in red).
Routine plumbing maintenance steps that help protect water-heating equipment can help catch small issues early and support reliable performance after installation.
Understanding Thermal Expansion Tanks
If your home has a “closed” plumbing system, which is common when a backflow preventer, check valve, or pressure-reducing valve is installed on your main water line, you will need a thermal expansion tank.
When water is heated, it expands. In an open system, this expanded water can push back into the municipal water main. In a closed system, the water has nowhere to go, causing pressure spikes that stress your pipes, joints, and the water heater tank itself. This constant pressure fluctuation can cause your T&P valve to drip and will drastically shorten your water heater’s lifespan.
Installing a thermal expansion tank on your cold water line provides a safe “cushion” for this expanding water. Before installing the expansion tank, you must use a manual air pump to pre-pressurize the tank’s internal bladder so it matches your home’s static water pressure exactly (typically between 50 and 70 PSI).
If your system’s pressure remains consistently high, it might be time to evaluate your overall plumbing health. You can explore whole-home repiping services to ensure your home’s infrastructure can handle modern pressure standards safely.
Expansion Tank Sizing Guide
| Water Heater Capacity (Gallons) | Recommended Expansion Tank Size (Gallons) |
|---|---|
| 30 to 50 Gallons | 2 Gallons |
| 50 to 80 Gallons | 4.5 to 5 Gallons |
| 80 to 120 Gallons | 10 Gallons |
Post-Installation Testing and Maintenance
With the physical connections complete, it is time to commission your new water heater safely.
- Fill the Tank Completely (Crucial Step): Open the cold water supply valve to start filling the tank. Go to a nearby hot water faucet and turn it on. At first, you will hear sputtering and air escaping. Keep the faucet running for at least three minutes after you get a steady, solid stream of water. This ensures all air pockets have been purged from the tank.
- Avoid Dry Firing: Never turn on the electrical breaker to an empty or partially filled water heater. Doing so will cause “dry firing,” which instantly burns out the upper heating element within seconds, requiring a complete element replacement.
- Restore Power: Once you are absolutely certain the tank is completely full of water, switch the circuit breaker back to the “ON” position.
- Check for Leaks: Carefully inspect all water connections, threaded joints, and the T&P valve for any signs of moisture. Wipe the joints with a dry paper towel to spot tiny pinhole leaks.
- Set the Temperature: Remove the access panels on the side of the heater and adjust the thermostats to 120°F (49°C). This is the industry-recommended setting that balances energy efficiency, prevents the growth of harmful bacteria like Legionella, and eliminates the risk of accidental scalding. Water at 140°F can cause a third-degree burn in just five seconds.
- Insulate the Pipes: Slide foam pipe insulation over the first few feet of the hot and cold copper lines to prevent standby heat loss, especially during cold Alaskan winters.
To keep your new system running efficiently, establish a routine of annual maintenance, including flushing sediment out of the bottom of the tank and checking the sacrificial anode rod every two to three years. Keeping up with routine plumbing maintenance can easily extend your water heater’s lifespan by up to 50%.
When to Call a Professional Plumber
While a like-for-like electric water heater swap is highly achievable for advanced DIYers, there are several scenarios where attempting the job yourself is simply not worth the safety risk.
- Gas Water Heaters: Installing a gas unit involves working with natural gas or liquid propane (LP) lines, complex draft venting, and combustion air requirements. A minor mistake with a gas line can lead to explosive hazards or deadly carbon monoxide poisoning.
- Electrical Upgrades: If you are converting from a gas unit to an electric model, you will need to run a new 240-volt dedicated circuit from your electrical panel, which requires advanced electrical expertise and local building permits.
- Complex Structural Changes: If your old piping is severely corroded, or if you need to relocate the water heater to a tight closet or attic space, a professional plumber is required to ensure the installation meets strict local building codes.
If you are dealing with any of these complex situations, it is highly recommended to seek expert plumbing solutions from a licensed team. Additionally, if you are looking to maximize your home’s efficiency and space, a professional can help you transition to modern, energy-efficient tankless water heaters to provide endless hot water on demand.
Frequently Asked Questions
How long does a standard tank-type water heater last?
Most conventional tank-type water heaters have an expected lifespan of 8 to 12 years. With regular maintenance, such as annual flushing and timely anode rod replacements, you can sometimes extend their operational life to 15 years or more.
What is dry firing and how do I avoid it?
Dry firing occurs when power is supplied to an electric water heater before the tank is completely filled with water. The upper heating element relies on surrounding water to dissipate heat; without it, the element overheats and burns out within seconds. To avoid this, always run a hot water faucet for three full minutes to purge all air before turning the circuit breaker on.
Do I need a permit to change out my water heater?
In many jurisdictions, including Anchorage, AK, a plumbing permit is required even for a like-for-like water heater replacement. Permitting ensures that safety features like thermal expansion tanks and T&P discharge lines are installed up to current local codes.
Why is my new water heater making a rumbling noise?
Rumbling or popping noises are typically caused by sediment buildup at the bottom of the tank. When water gets trapped beneath this layer of mineral scale, it boils and steam pockets burst through, creating a rumbling sound. Performing an annual tank flush will prevent this buildup.
What temperature should I set my new water heater to?
The EPA and most manufacturers recommend setting your water heater’s thermostat to 120°F (49°C). This temperature is hot enough to prevent bacterial growth while protecting your family from accidental scalding and reducing standby energy loss.
How often should I flush my water heater tank?
You should flush your water heater tank at least once a year. If you live in an area with high mineral content (hard water), flushing the tank every six months will help maintain heating efficiency and prevent sediment damage.
What does a thermal expansion tank do?
A thermal expansion tank acts as a safety cushion in a closed plumbing system. When water heats up inside your water heater, it expands. The expansion tank absorbs this extra volume and prevents dangerous pressure spikes that could damage your pipes and water heater tank.
Can I convert my electric water heater to gas?
Yes, but it is a complex conversion. You will need a licensed professional to run a new gas line, install a dedicated venting system through your roof or wall, and cap off the old high-voltage electrical lines.
Why is water dripping from my T&P relief valve discharge pipe?
Water dripping from the discharge pipe usually indicates either excessive water pressure in your home (above 80 PSI), thermal expansion issues in a closed plumbing system, or a faulty T&P valve that needs to be replaced.
How do I know if my water heater is leaking or just has condensation?
New water heaters often produce condensation when they are filled with cold water for the first time, or during heavy water usage in winter. This condensation can drip and mimic a leak. Wipe the area dry and monitor it; if the pooling continues after the water has fully heated, you likely have a physical leak.
Conclusion
Tackling a water heater replacement can be a highly rewarding DIY project that saves you money and gives you a deeper understanding of your home’s plumbing infrastructure. However, because this job sits right at the intersection of high-voltage electricity, high water pressure, and local building codes, safety must always remain your top priority. One minor oversight can lead to expensive water damage, electrical issues, or a ruined appliance.
If you hit a snag, discover corroded piping, or want the peace of mind that comes with a professional, code-compliant installation, Drain Masters is ready to help. Contact our professional water heater technicians to schedule service and help keep your home supplied with reliable hot water.