
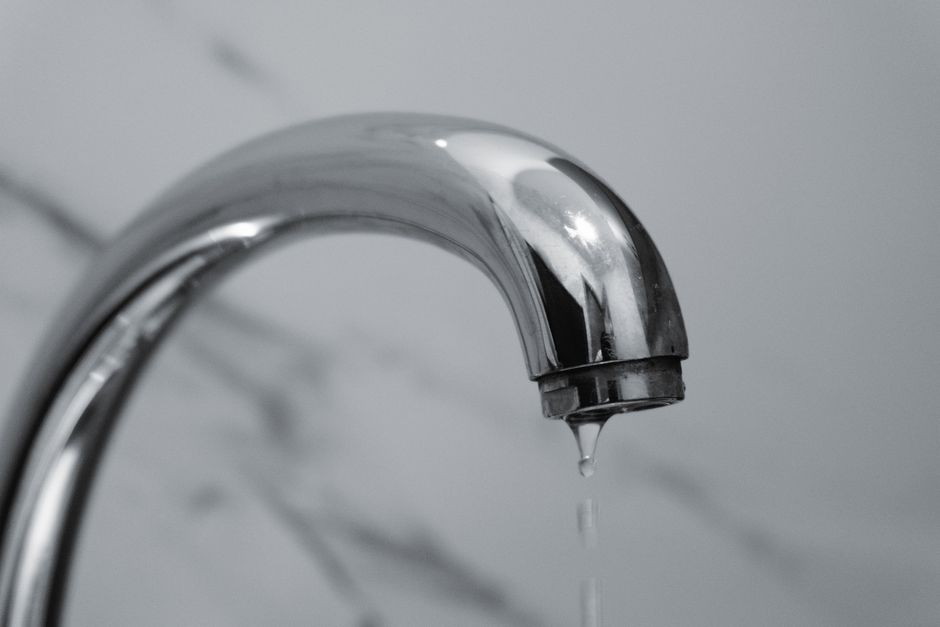
A Dripping Faucet Is More Than Just an Annoyance
Dripping faucet repair is something most Anchorage, AK homeowners can tackle themselves, and it usually comes down to one small, worn-out part. When you first notice that slow, rhythmic sound of water hitting the sink basin, it is easy to push the chore to the back of your mind. However, ignoring a plumbing issue like this can lead to much larger headaches down the road, including water damage, high utility bills, and unnecessary strain on your local municipal water system.
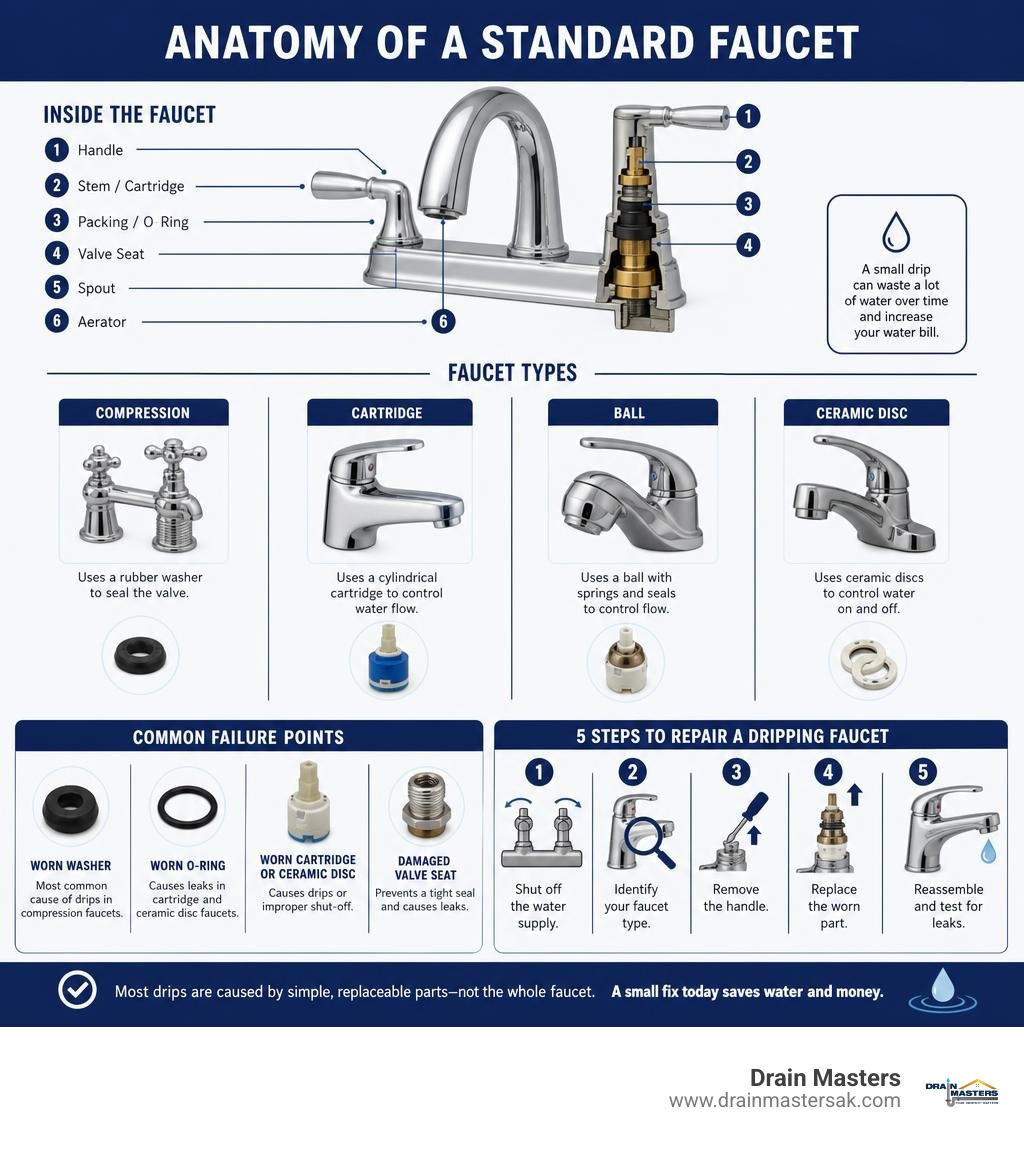
Here is how to fix a dripping faucet in 5 steps:
- Shut off the water supply under the sink by turning both valves clockwise until they stop.
- Identify your faucet type — compression, cartridge, ball, or ceramic disc.
- Remove the handle by prying off the decorative cap and unscrewing the fastener underneath.
- Replace the worn part — usually a rubber washer, O-ring, or cartridge.
- Reassemble and test by slowly turning the water back on and checking for leaks.
That steady drip you hear at night is not just irritating. A faucet dripping once per second wastes up to 3,000 gallons of water every year. That is a real hit to your water bill and the environment, all from a part that often costs less than a few dollars to replace. When you multiply that single fixture by all the households in Anchorage, AK, the sheer volume of wasted clean water is staggering.
The good news? Most dripping faucets do not need a full replacement, and they do not require a plumber for straightforward cases. With the right guidance, basic tools, and a matching replacement part, this is a repair most homeowners can complete in under an hour. Taking the time to understand how your home plumbing works is a great way to build confidence and save money on routine maintenance.
I’m Debra Blouin, General Manager of Drain Masters and a plumbing industry professional with over two decades of experience helping Anchorage, AK homeowners solve problems like dripping faucet repair before they become bigger and costlier issues. This guide walks you through everything you need to know, step by step, so you can stop the drip and restore peace to your home.
Simple guide to dripping faucet repair:
The Environmental and Financial Impact of a Dripping Faucet Repair
While a single drop of water falling into your sink might seem insignificant, those tiny droplets accumulate rapidly. According to data from the Environmental Protection Agency (EPA) WaterSense program, household leaks combined waste nearly 1 trillion gallons of water annually nationwide. In fact, dripping faucets account for roughly 37% of all residential plumbing service calls. This is why addressing a leak early is one of the smartest decisions you can make for your household budget and the local environment.
When you ignore a leaky fixture, you are not just watching money slip down the drain; you are also putting unnecessary stress on our local municipal water system. Every gallon of clean, treated water that leaks out of your faucet travels directly to the wastewater treatment plant, requiring energy and resources to process all over again. By taking care of repairs promptly, you help conserve valuable resources and keep municipal operations running efficiently.
If you suspect your home has other hidden leaks, learning the signs your home has a water leak can help you catch issues before they cause structural damage.
To help visualize how quickly minor drips escalate, consider this comparison of water waste by drip rate:
| Drip Rate | Gallons Wasted Per Day | Gallons Wasted Per Year | Estimated Impact |
|---|---|---|---|
| 1 drip per minute | 0.1 gallons | 34 gallons | Negligible but preventable |
| 10 drips per minute | 1.0 gallons | 348 gallons | Equivalent to several loads of laundry |
| 60 drips per minute (1/sec) | 8.2 gallons | 3,000 gallons | Equivalent to taking 180 extra showers |
| 120 drips per minute | 16.4 gallons | 6,000 gallons | Significant increase in municipal utility bills |
Essential Tools and Preparation for Faucet Troubleshooting
Before we roll up our sleeves and begin the disassembly process, we need to gather the correct tools. Having everything within arm’s reach ensures a smooth, uninterrupted repair. Taking a few minutes to organize your workspace beforehand will save you from making multiple trips to the garage or local hardware store mid-repair.

To complete a standard repair, you will typically need:
- An adjustable wrench
- Flathead and Phillips screwdrivers
- An Allen wrench (hex key) set
- Needle-nose pliers
- Plumber’s grease (silicone-based, heat-proof lubricant)
- Replacement parts (washers, O-rings, or a new cartridge)
- A clean towel or washcloth
- A small flashlight
Keeping your plumbing fixtures in good working order is a key part of maintaining your home’s value. Incorporating these tasks into your smart plumbing maintenance practices will prevent sudden failures and prolong the life of your plumbing system.
Safely Shutting Off the Water Supply
The absolute first rule of any plumbing project is to turn off the water supply. If you skip this step, removing the faucet stem will turn your bathroom or kitchen into an indoor geyser. This can lead to immediate water damage to your cabinetry, flooring, and drywall, turning a simple ten-minute fix into an expensive restoration project.
Look directly underneath your sink cabinet for the shutoff valves (often called angle stop valves). You should see two valves: one for the hot water line and one for the cold water line. Turn both valves clockwise until they are fully closed.
Once the valves are tight, turn on the faucet handles completely. This releases any residual water pressure and drains the remaining water from the pipes. If no water comes out of the spout, you are safe to proceed.
Note: In older Anchorage, AK homes, these under-sink shutoff valves can sometimes seize up due to mineral buildup. If the valves refuse to budge, do not force them, as they can break and cause an immediate flood. Instead, you will need to shut off the main water valve for your entire home.
Preparing Your Workspace for a Dripping Faucet Repair
Once the water is off, we need to prep the physical work area. Start by laying a clean washcloth or towel over the sink drain. This serves two purposes: it protects your sink’s finish from dropped tools, and it prevents tiny, irreplaceable screws and washers from sliding down the drainpipe. There is nothing more frustrating than watching a vital retaining clip slip down the drain right as you are finishing up.
We also highly recommend using the “magnet trick.” Keep a small magnet nearby to secure the tiny metal retaining clips or screws that hold cartridges in place.
As you take the faucet apart, lay the components out on a clean surface in the exact order you removed them. Taking quick photos with your phone at each stage of disassembly is an excellent way to ensure you know exactly how to put everything back together. If you want to review a broad overview of different fixture layouts before starting, checking out resources like nearbyhunt.com can help build your confidence.
How to Identify and Fix the Four Common Faucet Types
To fix a leak successfully, you must first know which type of faucet you have. Faucets generally fall into four categories: compression, cartridge, ceramic disc, or ball. Each design operates on a slightly different mechanical principle, meaning the steps to disassemble them and the replacement parts required will vary.
If you are unsure of your faucet type, we can perform a quick diagnostic test. If your faucet has two separate handles that require multiple turns to go from fully off to fully open, you have a compression faucet. If the handles only require a smooth, quarter-turn or half-turn to operate, it is likely a cartridge or ceramic disc style. Single-handle faucets that glide in all directions usually contain a ball valve or a cartridge.
If you suspect you have leaks coming from other fixtures or pipes behind your walls, securing professional leak detection and repair services is the safest way to protect your home.
Compression Faucets and Washer Replacement
Compression faucets are the oldest and most traditional style. They work by using a threaded stem to press a rubber washer against a metal valve seat, blocking the flow of water. Over time, constant friction and hot water degrade the rubber washer, leading to leaks. Because they rely on physical compression, these washers are typically the first component to fail in older homes.
To repair a compression faucet:
- Remove the handle: Pry off the decorative cap (usually marked “H” or “C”) with a flathead screwdriver to reveal the handle screw. Unscrew and pull the handle straight up.
- Remove the stem: Use your adjustable wrench to unscrew the packing nut. Once loose, unscrew and lift out the stem assembly.
- Replace the washer: At the bottom of the stem, you will find a rubber washer secured by a brass screw. Remove the screw, swap the worn washer for an exact match, and reinstall the screw.
- Inspect the valve seat: Look down inside the faucet body. If the metal valve seat is pitted, rough, or corroded, a new washer will not seal properly and will wear out within weeks. You may need to use a valve seat dresser tool to smooth it out.
- Lubricate and reassemble: Apply a thin layer of plumber’s grease to the stem threads and the new washer, then reassemble the faucet in reverse order.
For a visual breakdown of this process, you can refer to The Home Depot’s guide on fixing a leaky faucet to see these components in detail.
Step-by-Step Dripping Faucet Repair for Cartridge Systems
Cartridge faucets are incredibly popular because they are highly reliable and easy to service. Instead of compressing rubber washers, they use a self-contained plastic or brass cartridge that controls water flow when holes in the cartridge align with holes in the faucet body. When a leak occurs, you usually just need to swap out the old cartridge for a new one.
To repair a cartridge faucet:
- Remove the handle: Locate the index cap or set screw (often hidden under a small plastic plug on the front or back of the handle). Loosen the screw with an Allen wrench or screwdriver and pull the handle off.
- Remove the retaining nut or clip: Depending on the brand, you will see a brass retaining nut or a small, U-shaped metal retaining clip holding the cartridge in place. Use needle-nose pliers to pull the clip straight up (keep your magnet handy so it doesn’t drop!).
- Extract the cartridge: Grab the top of the cartridge stem with pliers and pull it straight up. If it is stuck due to mineral buildup, you may need a specialized cartridge puller tool to extract it safely.
- Install the new cartridge: Bring the old cartridge to your local hardware store to find an exact physical match. Slide the new cartridge into place, ensuring the alignment tabs match the notches in the faucet body.
- Reassemble: Reinstall the retaining clip or nut, replace the handle, and tighten the set screw.
Ceramic Disc Faucet Maintenance
Ceramic disc faucets represent a premium, highly durable design. Inside the faucet, two polished ceramic discs slide against each other. When the openings align, water flows; when they turn away, the seal is watertight. These discs are incredibly hard and rarely wear out, but mineral deposits from hard water can get trapped between them, causing slow drips. Cleaning them often restores perfect function.
To service a ceramic disc faucet:
- Disassemble the handle: Remove the handle screw and pull the handle cap off to expose the cartridge.
- Remove the disc cartridge: Unscrew the decorative metal collar and the brass mounting screws holding the cylinder cartridge in place. Lift the cartridge out.
- Clean the components: Inspect the rubber seals at the bottom of the cartridge. If they are dirty, soak the entire cartridge in warm white vinegar for 15 to 20 minutes to dissolve mineral scaling. Gently scrub away any remaining debris with an old toothbrush.
- Check for physical damage: If the ceramic discs themselves are cracked or deeply scratched, cleaning will not solve the issue. You will need to replace the entire disc cartridge.
- Reinstall: Place the clean or new cartridge back into the faucet body, secure the mounting screws, and reinstall the handle.
Ball Faucet Repair and Reassembly
Ball faucets are single-handle fixtures commonly found in kitchens. They utilize a slotted metal or plastic ball rotating inside a dome-shaped chamber to control both temperature and water volume. Because they contain several small, moving parts, including rubber seats, small springs, and plastic cams, they are slightly more complex to repair. Taking your time during disassembly is key to a successful outcome.
To repair a ball faucet:
- Remove the handle: Loosen the set screw on the handle and lift it off.
- Unscrew the cap and collar: Use adjustable pliers (wrapped in a towel to protect the finish) to unscrew the dome-shaped cap.
- Remove the cam and ball: Lift out the plastic cam, the cam washer, and the rotating ball.
- Replace the seats and springs: Look inside the faucet body to locate the two rubber seats and small metal springs. Use a small screwdriver or needle-nose pliers to lift them out. Pop in a new set of springs and rubber seats from a manufacturer-specific repair kit.
- Reassemble: Place the ball back into the housing, ensuring the alignment pin on the faucet body fits into the groove on the ball. Position the new cam and cam washer, screw the dome cap back on, and reinstall the handle.
When to Repair vs. Replace Your Faucet
While most leaks can be resolved with a quick part swap, there comes a point where continuing to repair an old fixture is no longer practical. If your faucet is over 15 years old, has extensive exterior corrosion, or has a severely pitted internal valve body, replacing the entire unit is usually the smarter investment. This is also a great opportunity to update the aesthetic of your kitchen or bathroom.
When you choose to upgrade, you can select modern, water-efficient models that prevent future leaks and lower your utility bills. If you are weighing your options, scheduling comprehensive plumbing repairs or establishing a plan for routine plumbing maintenance can help you determine the most cost-effective path forward. A professional plumber can evaluate the condition of your pipes and fixtures to give you an honest recommendation on whether a repair or a full replacement makes the most sense for your home.
Frequently Asked Questions About Faucet Leaks
Why does my faucet only drip at night?
Water pressure in municipal water lines often rises at night when neighborhood demand drops. A worn rubber washer or seal that barely manages to hold back water under normal daytime pressure may fail and begin to drip under the higher water pressure experienced overnight.
How much water does a dripping faucet actually waste?
A faucet dripping once per second wastes roughly 3,000 gallons of water per year. If the leak increases to a steady stream, it can waste tens of thousands of gallons annually, significantly increasing your monthly water and sewer utility bills.
Can I use universal replacement parts for my faucet repair?
While some basic rubber washers are standard sizes, we highly recommend purchasing original equipment manufacturer parts. Universal cartridges and seals often do not fit perfectly, which can lead to immediate leaks or accelerated wear.
Why is my faucet still dripping after I replaced the washer?
If you replaced the washer on a compression faucet and it still leaks, the metal valve seat inside the faucet body is likely corroded or pitted. The rough metal surface prevents the new rubber washer from forming a watertight seal.
What is the difference between a spout drip and a base leak?
A spout drip indicates an internal seal or cartridge failure, as water is passing through the closed valve. A leak around the base of the faucet handle or spout collar usually points to a worn-out external O-ring or a loose packing nut.
How long does a typical faucet repair last?
A high-quality cartridge or ceramic disc replacement can easily last 5 to 10 years, or even longer. Basic rubber washer replacements on compression faucets typically last 3 to 5 years, though hard water can shorten this lifespan.
Why is my faucet handle so hard to turn?
A stiff handle is usually caused by mineral buildup binding the moving parts of the cartridge or stem. Over time, this friction degrades the internal seals, eventually causing the faucet to leak.
Is it safe to repair a faucet without turning off the main water supply?
It is safe to perform the repair if the local under-sink isolation valves are working perfectly and completely shut off the water flow. Always open the faucet handles after turning the valves off to verify that the water has stopped completely.
What should I do if my under-sink shutoff valves are stuck?
If the valves are seized, do not attempt to force them with heavy tools, as they can snap and cause major water damage. Instead, locate your home’s main water shutoff valve, close it completely, and plan to have the under-sink valves replaced.
When is it time to call a professional plumber for a leaky faucet?
You should call a professional if your shutoff valves are stuck, if the faucet body is cracked or heavily corroded, if the leak persists after multiple repair attempts, or if you do not feel comfortable handling the disassembly yourself.
Conclusion
Taking care of a dripping faucet repair is an excellent way to save water, protect your home from moisture damage, and keep your utility bills manageable. While many faucet repairs are perfectly suited for a Saturday afternoon DIY project, working with pressurized water always carries a small risk. If you run into stuck valves, stripped screws, or a leak that refuses to stop, your safety and your home’s plumbing integrity should always come first. Knowing when to step back and call in professional support is the hallmark of a smart homeowner.
If you find yourself facing a stubborn plumbing issue, need help with a complex fixture installation, or require professional professional plumbing services to keep your home running smoothly, we are here to help. You can easily contact us today to speak with a licensed technician.
When you need reliable, expert assistance to resolve a leak once and for all, you can count on the dedicated team at Drain Masters for high-quality dripping faucet repair in Anchorage, AK.