
Is Your Toilet Wasting Water? Start Here
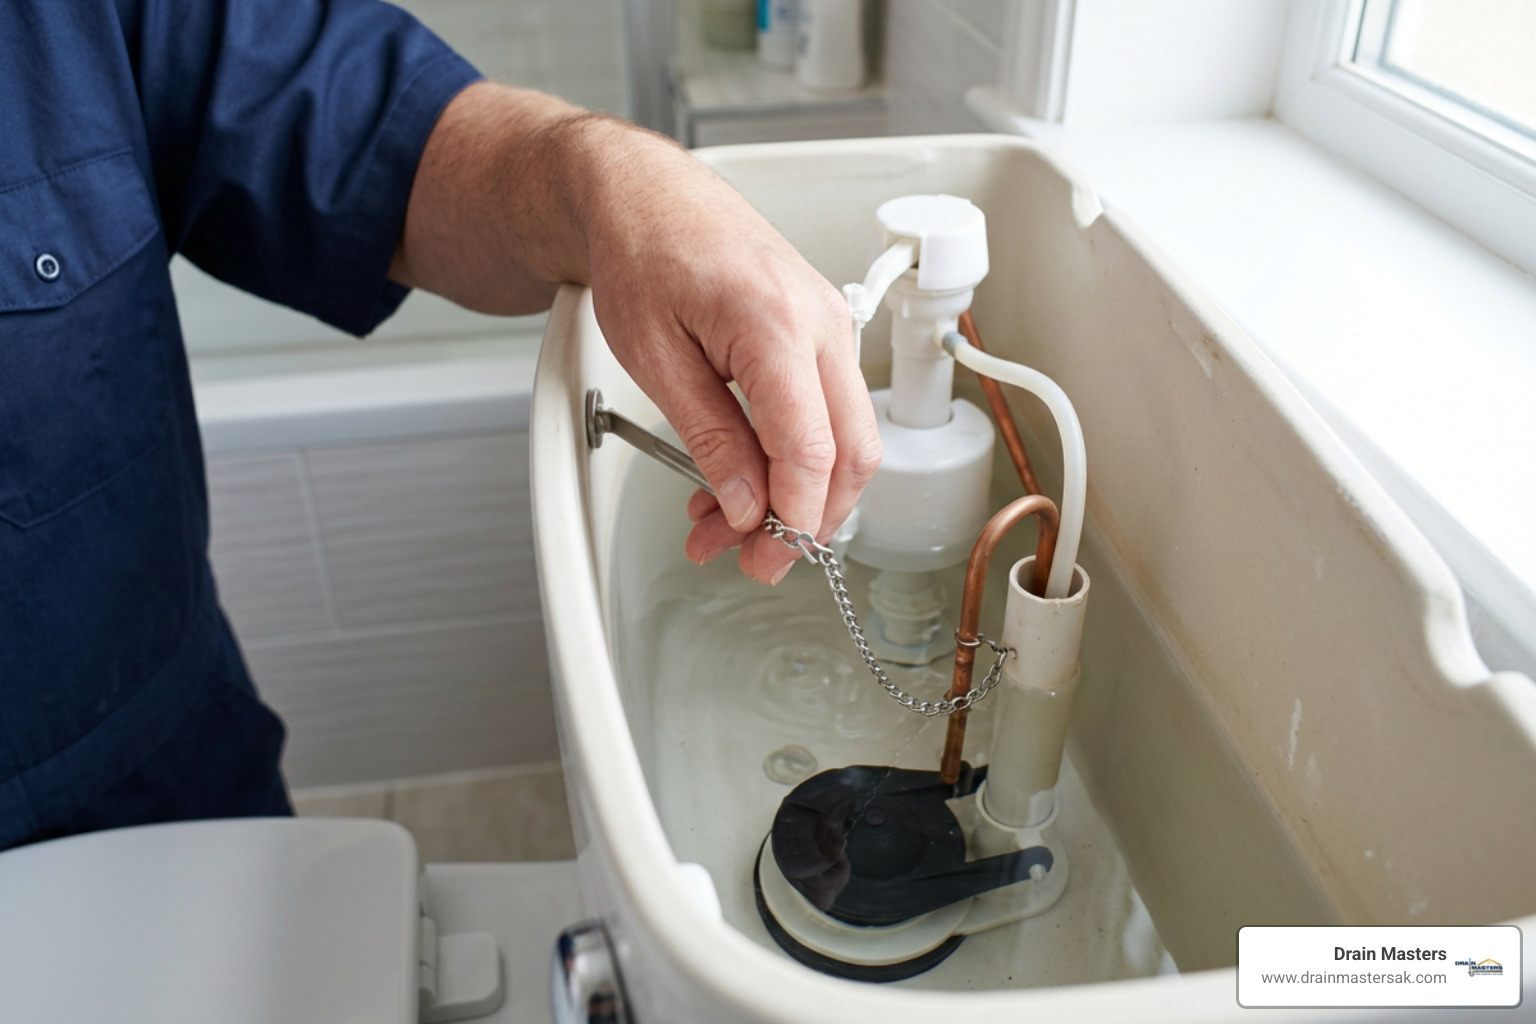
Toilet chain repair is one of the easiest DIY plumbing fixes a homeowner can do. If your toilet won’t flush, runs constantly, or the handle feels loose, a broken or misadjusted chain is likely the cause.
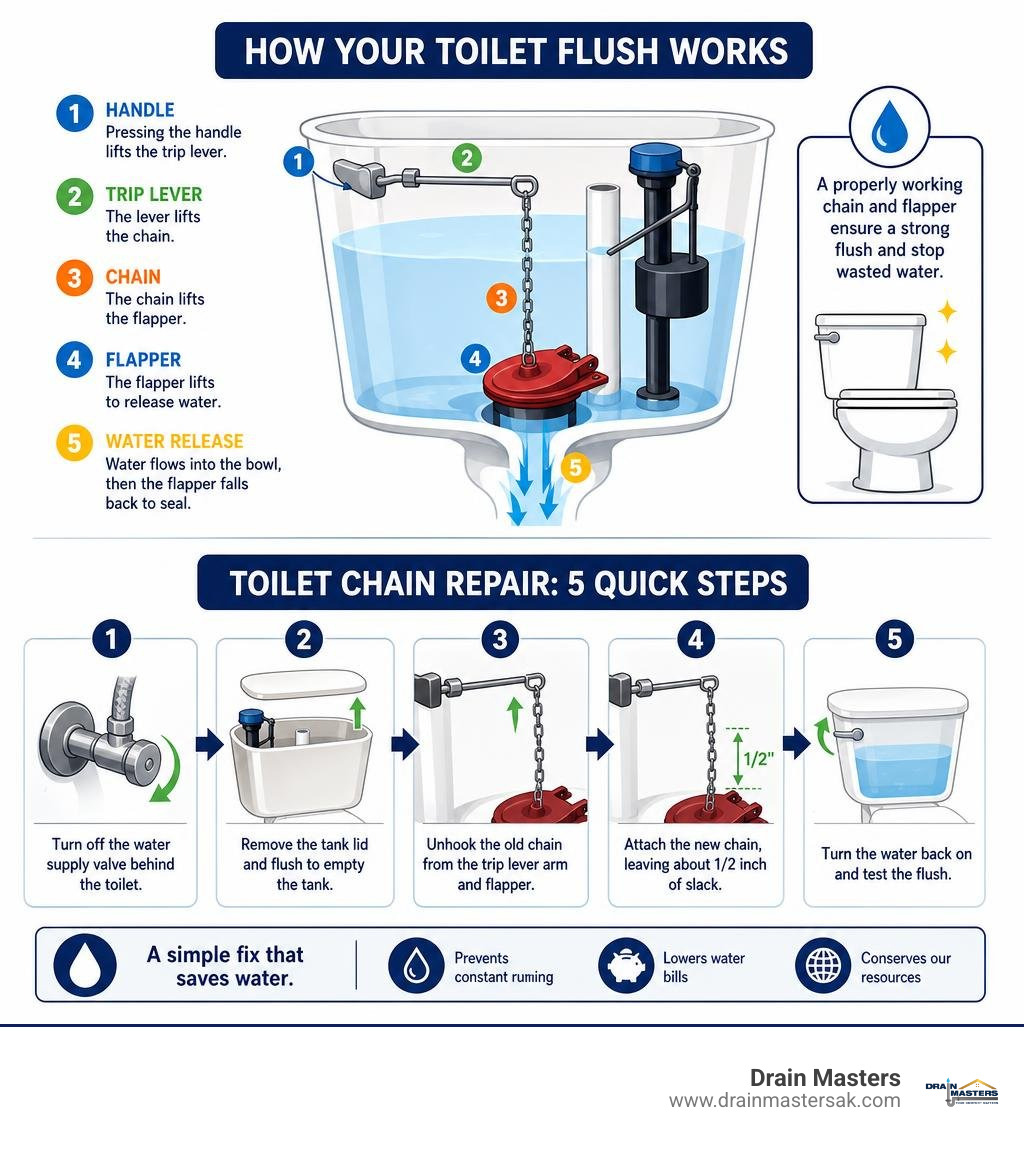
Here’s how to fix a toilet chain in 5 steps:
- Turn off the water supply valve behind the toilet.
- Remove the tank lid and flush to empty the tank.
- Unhook the old chain from the trip lever arm and flapper.
- Attach the new chain, leaving about 1/2 inch of slack.
- Turn the water back on and test the flush.
A faulty chain might seem like a small problem, but it can quietly waste hundreds of gallons of water every month. Nearly 30% of reported toilet issues are linked to chain-related problems, and most of them are completely fixable without calling a plumber.
That said, some situations do call for professional help. If the chain looks fine but the toilet still runs or flushes poorly, a worn flapper or damaged flush valve may be the real culprit.
I’m Debra Blouin, General Manager of Drain Masters in Anchorage, AK, and with over two decades of plumbing service experience, toilet chain repair is one of the most common issues our team helps homeowners diagnose and resolve. Whether you’re tackling this yourself or need a hand, this guide walks you through everything you need to know.
To ensure your home remains comfortable and efficient, it is also wise to keep up with other essential home systems. If you ever experience issues with your heating or cooling, getting professional heating and cooling assistance can prevent minor issues from turning into major household emergencies.
Understanding the Toilet Flush Mechanism
To successfully complete a toilet chain repair, it helps to understand what is happening inside your porcelain throne. The magic of the modern flush relies on a simple gravity-fed system. When you press down on the toilet handle, you are initiating a mechanical chain reaction inside the tank.
The handle is connected to a horizontal metal or plastic rod called the trip lever (or flush lever). Attached to the end of this lever is the lift chain, which hangs vertically down to the flapper valve. The flapper is a rubber seal that sits over the flush valve seat, keeping the water in the tank from spilling into the bowl.
When you push the handle, the trip lever lifts the chain, which yanks the flapper upward. Water rushes from the tank into the bowl, creating the siphon effect that clears the waste. Once the water level in the tank drops, the flapper falls back down over the flush valve, sealing the opening so the tank can refill. Including this simple system in your regular plumbing maintenance is crucial to preventing unexpected leaks and high utility bills.
Why DIY Toilet Chain Repair Saves Water
A broken, rusted, or poorly adjusted lift chain is a primary driver of household water waste. If the chain is too long, it can easily slide under the flapper as it closes, breaking the watertight seal. This allows water to constantly trickle from the tank into the bowl, which is a phenomenon known as a running toilet.
On the other hand, if the chain is too tight, it will keep the flapper slightly propped open. This continuous flow can waste thousands of gallons of water a month, leading to shockingly high water bills. Performing a quick toilet chain repair stops these leaks immediately, protecting both your wallet and our local Anchorage water resources.
How the Lift Chain Operates
The entire flush cycle hinges on tension and slack. The lift chain must be perfectly calibrated to bridge the gap between the trip lever arm and the flapper.
- When resting: The chain must have a small amount of slack so it does not pull up on the flapper.
- When pulled: The chain must pull straight up on the flapper without catching, bending, or snagging on other components like the overflow tube or the tank’s fill valve.
If the tension is off by even a fraction of an inch, the flapper may fail to open fully (resulting in a weak flush) or fail to close completely (resulting in a running toilet). Understanding these mechanical relationships is the first step toward mastering home maintenance.
Choosing the Right Replacement Toilet Chain
If your chain is rusted, broken, or constantly tangling, it is time for a replacement. Fortunately, finding a replacement chain is straightforward, as most big-box stores and local plumbing supply houses carry universal kits.
| Chain Type | Material | Durability | Best For |
|---|---|---|---|
| Standard Link Chain | Stainless Steel | High | Universal residential use; highly durable |
| Beaded Chain | Stainless Steel / Brass | High | Preventing tangles; older toilet models |
| Plastic Link Chain | Plastic / Polymer | Medium | Quiet operation; completely rust-proof |
Choosing the right material ensures you will not have to open your toilet tank again anytime soon. Pricing for these parts can vary depending on several factors, such as the material, brand, and whether you purchase a single chain or a multi-pack, but they generally remain a very affordable DIY fix.
Stainless Steel vs. Plastic Chains
Most professional plumbers prefer stainless steel chains for toilet chain repair. Stainless steel resists rust and corrosion in wet environments, preventing the metal from weakening over time.
Plastic chains are also available. While they are completely immune to rust and operate very quietly, they are more flexible and lightweight. This extra flexibility means they can stretch under heavy use or fail to drop the flapper cleanly, requiring more frequent adjustments. Furthermore, mineral deposits from hard water can build up on plastic links, causing them to become stiff and lose their shape.
Beaded Chains vs. Standard Link Chains
Beaded chains consist of small metal spheres linked together, similar to the pull chain on a ceiling fan. These are excellent at preventing tangles because they do not have open links that can hook onto one another. However, standard link chains remain the industry standard because they make it incredibly easy to adjust the length link-by-link using a small hook or clip.
Step-by-Step Guide to Toilet Chain Repair
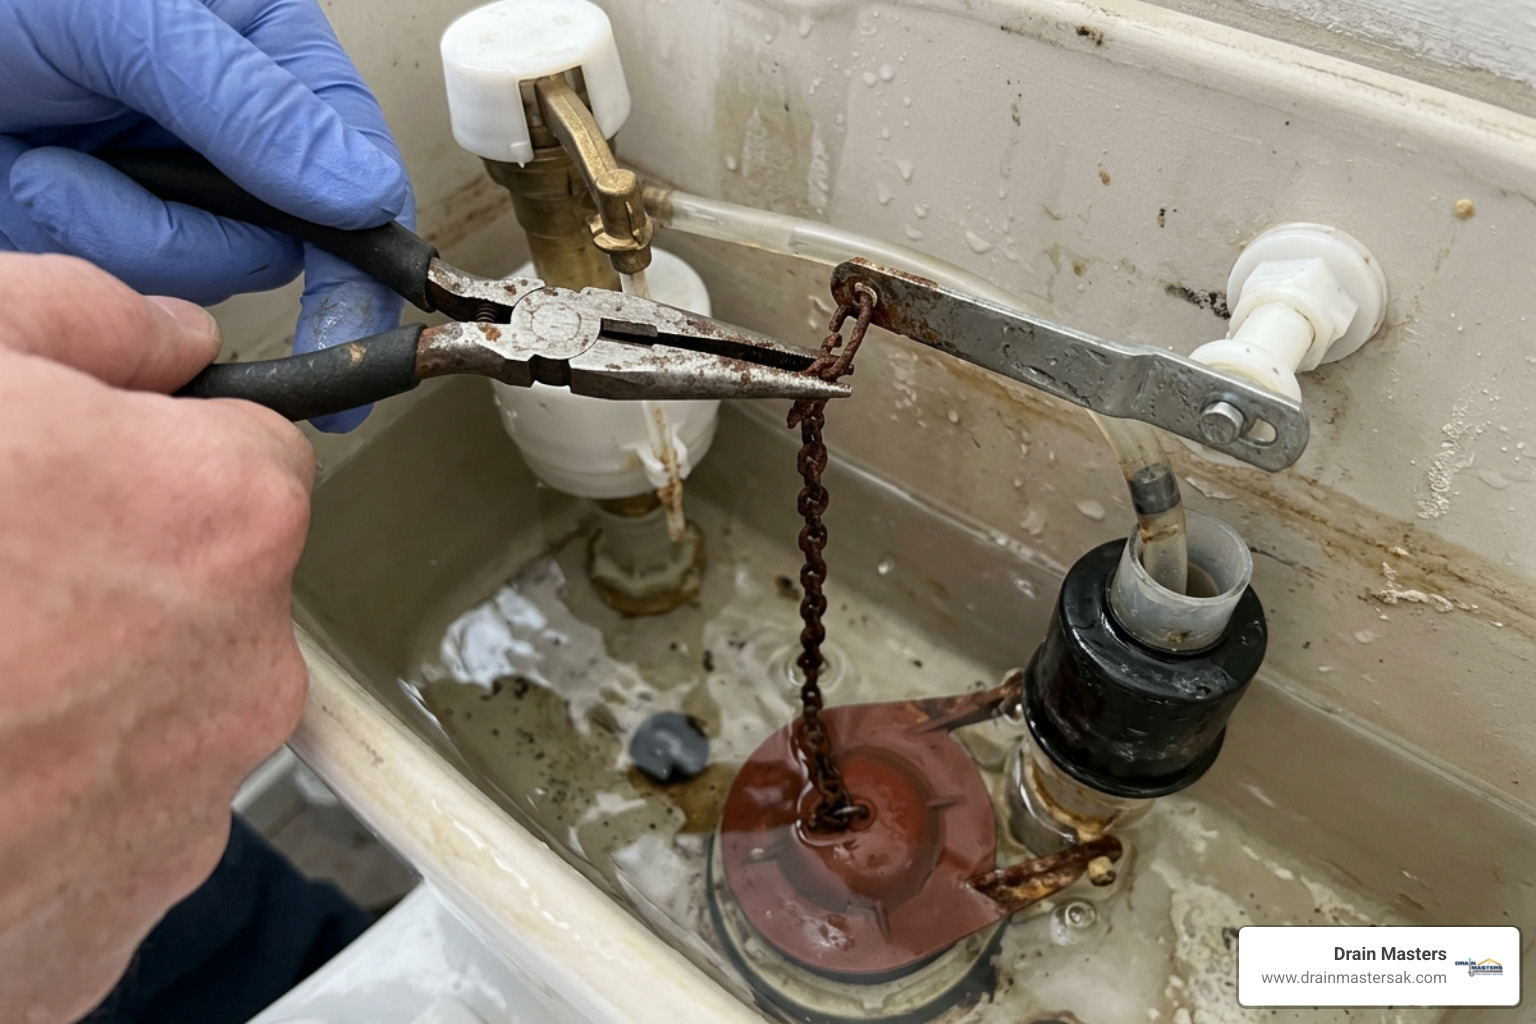
Before starting your repair, gather a few basic tools. You will need a pair of needle-nose pliers, a replacement chain (or a universal flapper kit), a sponge, and a pair of rubber gloves to keep your hands clean. While the water inside a toilet tank is clean, mineral buildup and sediment can stain your hands.
Always prioritize safety. When working inside the porcelain tank, handle the ceramic lid with extreme care. Ceramic is heavy and slippery when wet; dropping it can shatter the lid or crack your toilet bowl, turning a simple chain fix into a major plumbing emergency. For a detailed visual breakdown of this process, you can refer to the iFixit Repair Guide.
Preparing the Toilet Tank for Repair
First, locate the water shutoff valve on the wall behind or beneath your toilet. Turn this valve clockwise until it is completely closed.
Next, press and hold the flush handle to empty the water from the tank. You will notice that a small amount of water remains at the bottom of the tank. This is perfectly normal and clean. You can use a sponge to soak up this excess water if you want a completely dry workspace, though it is not strictly necessary for a simple chain replacement.
Removing the Old Chain and Installing the New One
- Disconnect the old chain: Locate where the chain connects to the trip lever arm. Unhook the clip. Next, unhook the bottom of the chain from the flapper valve. If the old chain is rusted shut, use your needle-nose pliers to gently pry the hooks open.
- Inspect the flapper: Check the attachment loop on the flapper itself. If this plastic loop is broken or cracked, you will need to replace the entire flapper.
- Attach the new chain: Secure the new chain to the flapper first. Most chains come with a triangular hook or a plastic clip that snaps onto the flapper’s attachment point. For more tips on securing these connections, check out the HandyManHowTo Guide.
- Connect to the trip lever: Thread the top hook of the chain through one of the holes on the trip lever arm. Choose a hole that positions the chain vertically straight above the flapper to prevent the chain from pulling at an angle.
Adjusting Chain Length for Optimal Tension
This is the most critical step of the toilet chain repair. If the chain is too tight, the flapper will leak. If it is too loose, the toilet will not flush completely.
We recommend the half-inch rule: with the flapper completely closed and the flush handle resting in its normal position, there should be approximately 1/2 inch of slack in the chain. This translates to about one or two loose links. Use your pliers to adjust the clip to the correct link, then cut off any excess chain with wire cutters, leaving two or three extra links at the end for future adjustments. If you find that adjusting the chain does not resolve your flushing issues, it may be time to seek professional plumbing repairs.
Testing and Troubleshooting Your Repair
Once your new chain is installed and adjusted, it is time to test your handiwork.
Turn the water supply valve counterclockwise to turn the water back on. Let the tank fill completely. Watch the fill valve to ensure it shuts off when the water reaches the designated fill line. If you notice any unusual drainage or suspect a deeper leak, look out for other signs your drain needs repair to keep your home’s waste system running smoothly.
Troubleshooting Common Toilet Chain Repair Issues
If your toilet still behaves strangely after the repair, use this quick troubleshooting guide:
- The toilet keeps running: The chain is likely too tight or caught on something. Ensure there is enough slack and that the chain is not catching on the overflow tube.
- You have to hold the handle down to flush: The chain is too loose. Shorten the chain by one or two links.
- The handle sticks down: The chain might be catching on the trip lever or tank wall. Reposition the chain hook to a different hole on the lever arm.
Fixing Chain Slippage and Snags
If your chain frequently slips off the trip lever, the hook may be bent open. Use your needle-nose pliers to squeeze the hook closed so it cannot slide out of the lever hole. If the links are catching on each other due to mineral buildup, you can apply a tiny drop of silicone-based lubricant to the links to help them glide smoothly. Avoid using harsh chemical lubricants, as they can degrade the rubber flapper over time.
When to Replace the Entire Flapper or Flush Valve
Sometimes, a simple toilet chain repair is not enough. Over time, the rubber flapper inside your tank degrades due to constant submersion in water and exposure to household cleaning chemicals.
If you notice that the rubber of your flapper feels sticky, soft, or leaves a black residue on your fingers when touched, the flapper has reached the end of its lifespan. A degraded flapper will never seal properly, regardless of how perfectly you adjust the chain. In these cases, installing a new flapper, or coordinating a new toilet installation if your fixture is outdated, is the best path forward.
Signs of a Failing Flapper Valve
Keep an eye out for “ghost flushing” which is when the toilet suddenly refills for a few seconds even though no one has flushed it. This is a classic sign of a slow leak caused by a failing flapper valve or a warped flush valve seat.
Upgrading to Modern Flush Systems
If your toilet tank components are old and constantly giving you trouble, you might want to consider upgrading to a modern canister flush valve. Canister valves lift straight up and down, eliminating the traditional flapper and chain altogether. This design reduces mechanical wear and tear, providing a highly reliable and water-efficient flush for years to come.
Frequently Asked Questions about Toilet Chain Repair
How much slack should a toilet flapper chain have?
A toilet flapper chain should have approximately 1/2 inch of slack when the flapper is completely closed. This is usually equivalent to about one or two slack links, which ensures the flapper can seal tightly without being pulled open prematurely.
Why does my toilet chain keep falling off?
Your toilet chain may keep falling off if the connection hooks are bent open, or if the clip has worn out. Squeezing the metal hooks closed with needle-nose pliers or replacing a plastic clip will usually keep the chain securely attached.
Can I use a temporary substitute like fishing line for a toilet chain?
Yes, you can use a strong fishing line or a plastic zip tie as a temporary substitute to restore flushing capability. However, these materials can stretch, degrade, or snap quickly in water, so you should replace them with a proper metal chain as soon as possible.
What are the signs that my toilet chain is too tight?
If your toilet chain is too tight, the flapper will not close completely, causing a constantly running toilet. You may also hear water trickling into the bowl or notice the fill valve cycling on and off periodically.
What are the signs that my toilet chain is too loose?
When a toilet chain is too loose, pressing the flush handle will not lift the flapper high enough to initiate a complete flush. You may have to hold the handle down manually to get the toilet to flush fully.
How do I measure the correct length for a replacement toilet chain?
To find the correct length, measure the distance from the tip of the trip lever arm to the flapper connection point when both are in their resting positions, then add an extra 2 to 3 inches to account for adjustment slack and natural wear.
Why is my toilet running even after I adjusted the chain?
If your toilet continues to run after adjusting the chain, the flapper itself may be warped, dirty, or degraded. Alternatively, mineral deposits on the flush valve seat may be preventing the flapper from creating a watertight seal.
Can hard water affect my toilet flapper chain?
Yes, hard water contains minerals like calcium and magnesium that can build up on the chain links. This buildup can make the chain stiff, causing it to kink, tangle, or fail to drop the flapper cleanly.
How much does a replacement toilet chain cost?
A replacement toilet chain is highly affordable, though pricing can vary depending on several factors, such as the material, length, and whether you purchase it individually or as part of a complete flapper rebuild kit.
When should I call a professional plumber for a toilet chain issue?
You should call a professional plumber if adjusting or replacing the chain does not stop your toilet from running, if you notice water leaking from the base of the toilet, or if you suspect a deeper clog in your home’s drain lines.
Conclusion
While a simple toilet chain repair is a fantastic DIY project, plumbing systems can sometimes present unexpected challenges. If you find yourself struggling with a stubborn leak, a cracked tank, or persistent drainage issues, it is always safest to call in the experts to prevent accidental water damage to your home.
At Drain Masters, we have served the Anchorage, AK community as a family-owned business for over 20 years. We complete over 4,000 jobs annually using advanced tools, video inspections, and upfront pricing to ensure your home’s plumbing remains in peak condition. For reliable service and peace of mind, contact Drain Masters today for all your expert plumbing repairs.