
When Your Garbage Disposal Stops Working, Here’s What to Do
Garbage disposal repair is something most Anchorage, AK homeowners will face at least once during their time in a home. Whether your unit is humming without grinding, leaking under the sink, or refusing to turn on at all, the good news is that many common problems have straightforward fixes that can be addressed quickly once you understand how the unit operates.
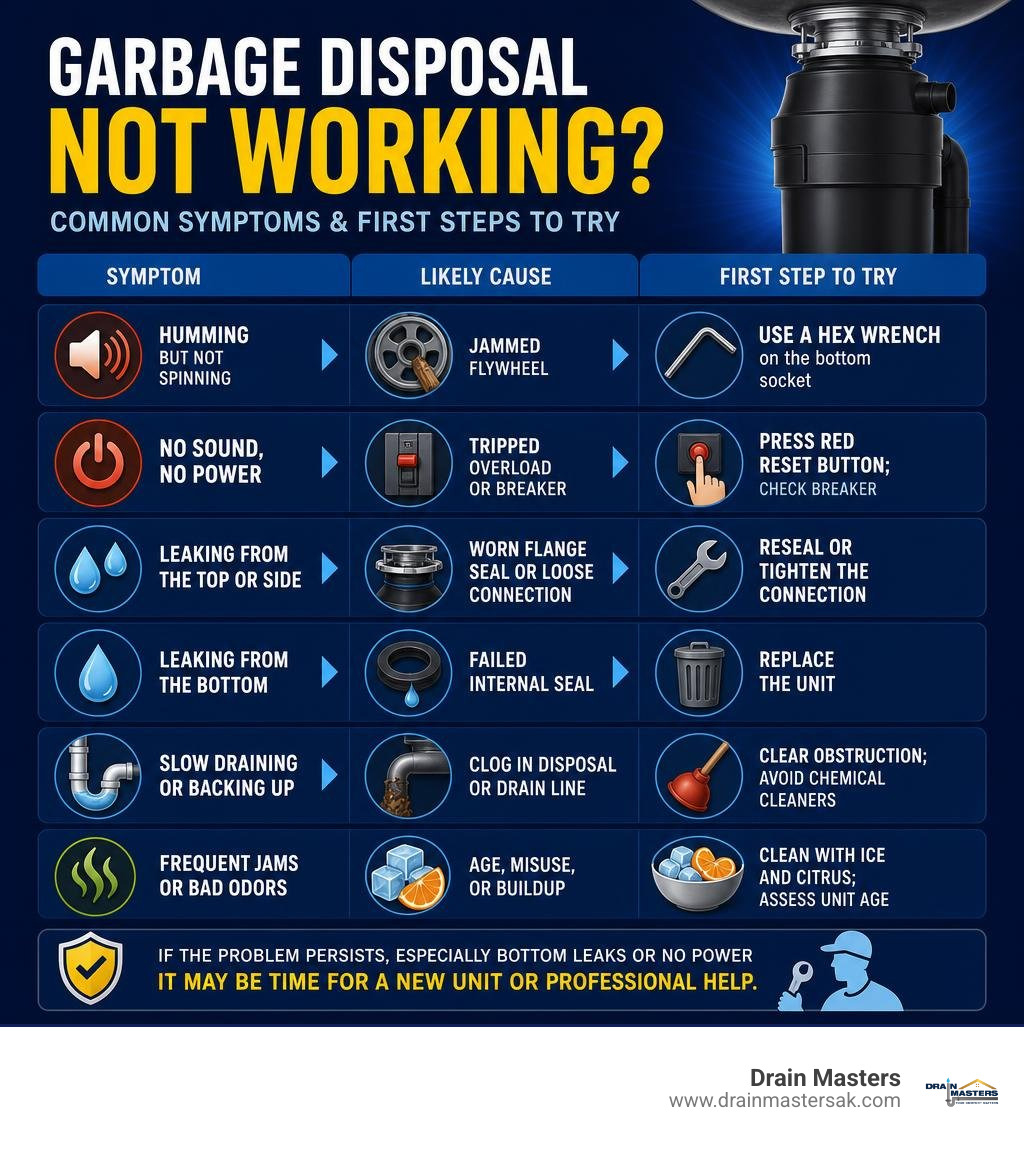
Here is a quick overview to match your situation:
| Symptom | Likely Cause | First Step |
|---|---|---|
| Humming but not spinning | Jammed flywheel | Use a hex wrench on the bottom socket |
| No sound, no power | Tripped overload or breaker | Press red reset button; check breaker |
| Leaking from the top or side | Worn flange seal or loose connection | Reseal or tighten the connection |
| Leaking from the bottom | Failed internal seal | Replace the unit |
| Slow draining or backing up | Clog in disposal or drain line | Clear obstruction; avoid chemical cleaners |
| Frequent jams or bad odors | Age, misuse, or buildup | Clean with ice and citrus; assess unit age |
Most kitchen sink disposal issues fall into one of four distinct categories: mechanical jams, drain line clogs, housing leaks, or electrical failures. Some of these issues can be resolved in a matter of minutes using standard household tools. Other situations, particularly leaks coming from the bottom of the motor housing or complete electrical failure due to age, indicate that it is time for a full unit replacement.
This guide walks you through how to diagnose the problem accurately, decide whether to repair or replace your unit, and know when it makes sense to bring in a licensed professional plumber.
At Drain Masters, our Anchorage, AK plumbing team brings more than two decades of hands-on experience to the disposal failures local homeowners run into most often. We will help you cut through the confusion so you can get your kitchen back to normal fast.
Troubleshooting Common Kitchen Issues and Garbage Disposal Repair
When your kitchen sink grinds to a sudden halt, it usually feels like an immediate emergency. Food waste begins to pool, standing water fills the basin, and dinner clean-up becomes a major headache for the entire household. Fortunately, a malfunctioning disposal does not always require a complete system overhaul. Understanding the basic mechanics of your appliance allows you to troubleshoot the issue safely and determine if a simple manual adjustment will resolve the problem.
Most residential units operate using an internal impeller plate that spins at high speeds, using centrifugal force to push food scraps against a stationary outer grind ring. When hard objects, stringy vegetable fibers, or foreign debris slip into the chamber, they can wedge between the spinning plate and the wall, seizing the entire mechanism. Before jumping to conclusions about motor failure, working through a structured troubleshooting process can save you time, effort, and unnecessary expense.
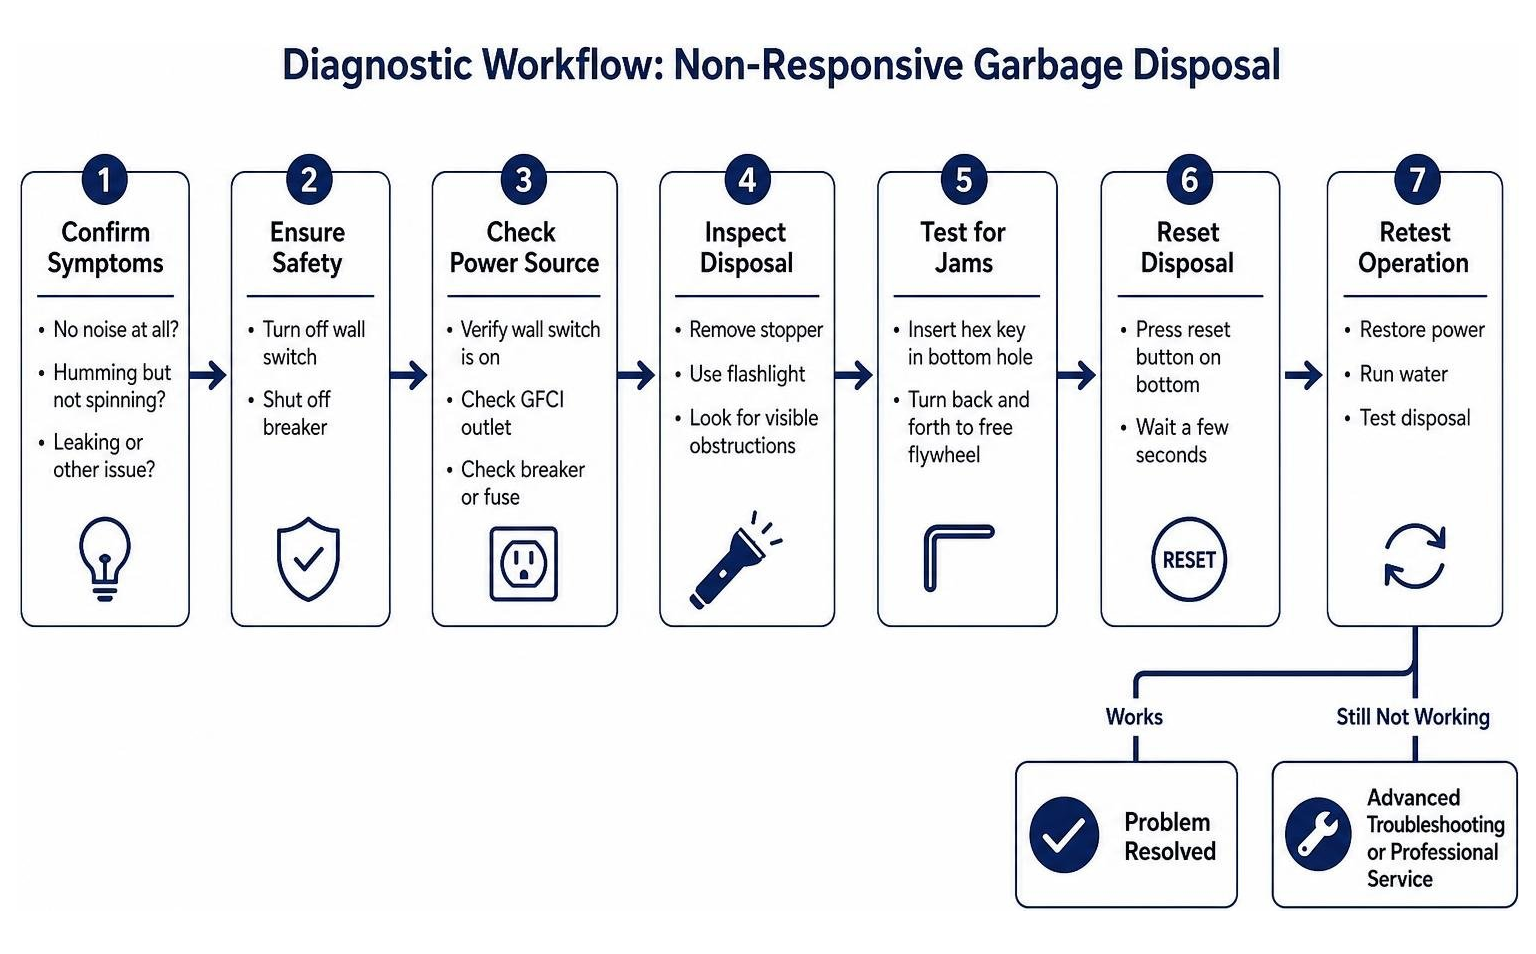
- Safety First: Always disconnect electrical power at the wall switch and the main circuit breaker box before placing tools near the disposal mouth.
- Visual Inspection: Use a bright flashlight to inspect the grinding chamber from above. Never insert your hand or fingers directly into the drain opening.
- Check Power Switches: Verify whether the wall outlet, GFCI switch, or home electrical panel has tripped under heavy load.
If troubleshooting points to a bigger issue than a simple reset, Drain Masters can help with common household plumbing repairs that address the disposal, nearby sink piping, and related fixtures together.
Troubleshooting a Disposal That Is Humming But Not Spinning
If flipping the wall switch produces a low electric hum but no grinding action, your unit’s motor is receiving electrical power, but the inner flywheel is mechanically jammed. Leaving the switch on while the motor hums generates severe internal heat that will trip the thermal overload protector within seconds to protect the motor windings from burning out.
To manually release a jammed flywheel, follow these safe unjamming steps:
- Turn off the wall switch and shut off the dedicated circuit breaker in your main electrical panel.
- Locate the small hex socket (Allen wrench hole) located squarely in the center of the unit’s bottom housing underneath the cabinet.
- Insert a standard 1/4-inch hex wrench into the socket.
- Wiggle and turn the wrench back and forth in both directions until you feel the rotating impeller plate break free and spin 360 degrees smoothly.
- Look into the top drain opening using a flashlight and use a long pair of kitchen tongs or needle-nose pliers to retrieve the dislodged foreign object, such as a fruit pit, bone fragment, or metal utensil.
- Restore electrical power, run a steady stream of cold water, and switch the disposal back on to test operation.
Resolving a Garbage Disposal Unit That Won’t Turn On
When flipping the power switch results in complete silence, the issue is almost certainly electrical rather than mechanical. Modern disposals feature an integrated thermal overload switch designed to cut circuit power whenever the motor overheats or experiences a severe mechanical jam.
Start by checking under the sink cabinet for the small red reset button located on the bottom or lower side of the motor housing. If the thermal protector has tripped, this red button will be popped outward about a quarter of an inch. Ensure the switch above is OFF, firmly press the red button back in until it clicks into place, and test the unit again.
If pressing the reset switch yields no results, check the GFCI outlet under the sink or along the kitchen countertop to confirm it has not tripped. Finally, inspect your home’s main circuit panel to check for a tripped breaker. If your unit regularly trips the breaker even after clearing obstructions, an internal short circuit or motor insulation failure may require professional attention.
Safe Techniques to Unclog Kitchen Sink Disposals
Standing water in your kitchen sink indicates a severe clog either within the unit’s discharge tube or down in the connected sink trap. Chemical drain cleaners should never be poured into a garbage disposal. Caustic chemical products damage internal rubber seals, corrode metal impellers, and pose severe burn hazards to technicians who must disassemble the pipes later.
To clear standing water safely without chemicals:
- Turn off power completely at the main panel to prevent accidental motor activation.
- Bail out excess standing water from the sink basin until only a shallow layer remains over the drain hole.
- Place a standard cup plunger over the disposal drain opening, ensuring a tight seal against the sink surface.
- Vigorously plunge up and down 10 to 12 times to break up soft organic blockages within the p-trap.
- Remove the plunger and check if water begins flowing freely down the pipe.
- Flush the line thoroughly with cold water to wash lingering debris down the main drainage line.
For stubborn blockages deep within kitchen branch lines, professional drain cleaning support can restore full flow without risking pipe corrosion or component damage.
Identifying Under-Sink Leaks: Flanges, Tubes, and Internal Seals
Water pooling beneath your kitchen cabinet is a clear sign that a seal or fitting has failed. Because garbage disposals vibrate heavily during normal daily operation, mounting hardware and pipe connections can gradually work themselves loose over years of service.
Identifying the precise origin of an under-sink leak determines whether you are dealing with a minor gasket adjustment or a major equipment failure. Perform a paper towel diagnostic test by wiping the entire unit dry, placing clean sheets of paper towels under each joint, and running cold water through the unit while observing where drops land.
Addressing Top Flange and Side Discharge Connection Leaks
Leaks originating near the top or upper side of the unit are frequently repairable through simple hardware adjustments or seal replacements:
- Sink Flange Leaks: Water dripping from the top area where the mounting assembly attaches to the sink strainer often indicates dried, cracked plumber’s putty or a loose snap ring. Disassembling the mounting ring, cleaning off old putty, applying a fresh bead of plumber’s putty, and re-securing the mounting assembly stops top-side leaks completely.
- Side Discharge Tube Leaks: Water pooling beneath the side discharge pipe usually stems from a worn rubber gasket or loose flange screws connecting the elbow pipe to the disposal housing. Replacing the rubber seal and tightening the mounting screws restores a watertight seal.
- Dishwasher Inlet Leaks: If water drips from the upper dishwasher hose connection, inspect the hose clamp for rust or looseness and replace cracked rubber connector hoses as necessary.
When recurring plumbing leaks cause standing water damage or lingering drain issues under your sink, Drain Masters can help you protect the cabinet and the connected drain line. The same warning signs are covered in this blog on preventing kitchen drain disasters, including how moisture and hidden clogs can create bigger problems over time.
Why Bottom Housing Leaks Require Full Unit Replacement
While top and side leaks are relatively quick fixes, water dripping directly from the center bottom shell or through the lower motor housing seams signals a structural component failure.
Inside every disposal unit, a high-speed internal shaft seal prevents grinding chamber water from entering the lower electrical motor casing. Over time, friction, hard water mineral deposits, and acidic food waste degrade this internal rubber shaft seal. Once water breaches this barrier, it flows directly through the electrical motor components and drains out through the bottom reset button hole or ventilation slots.
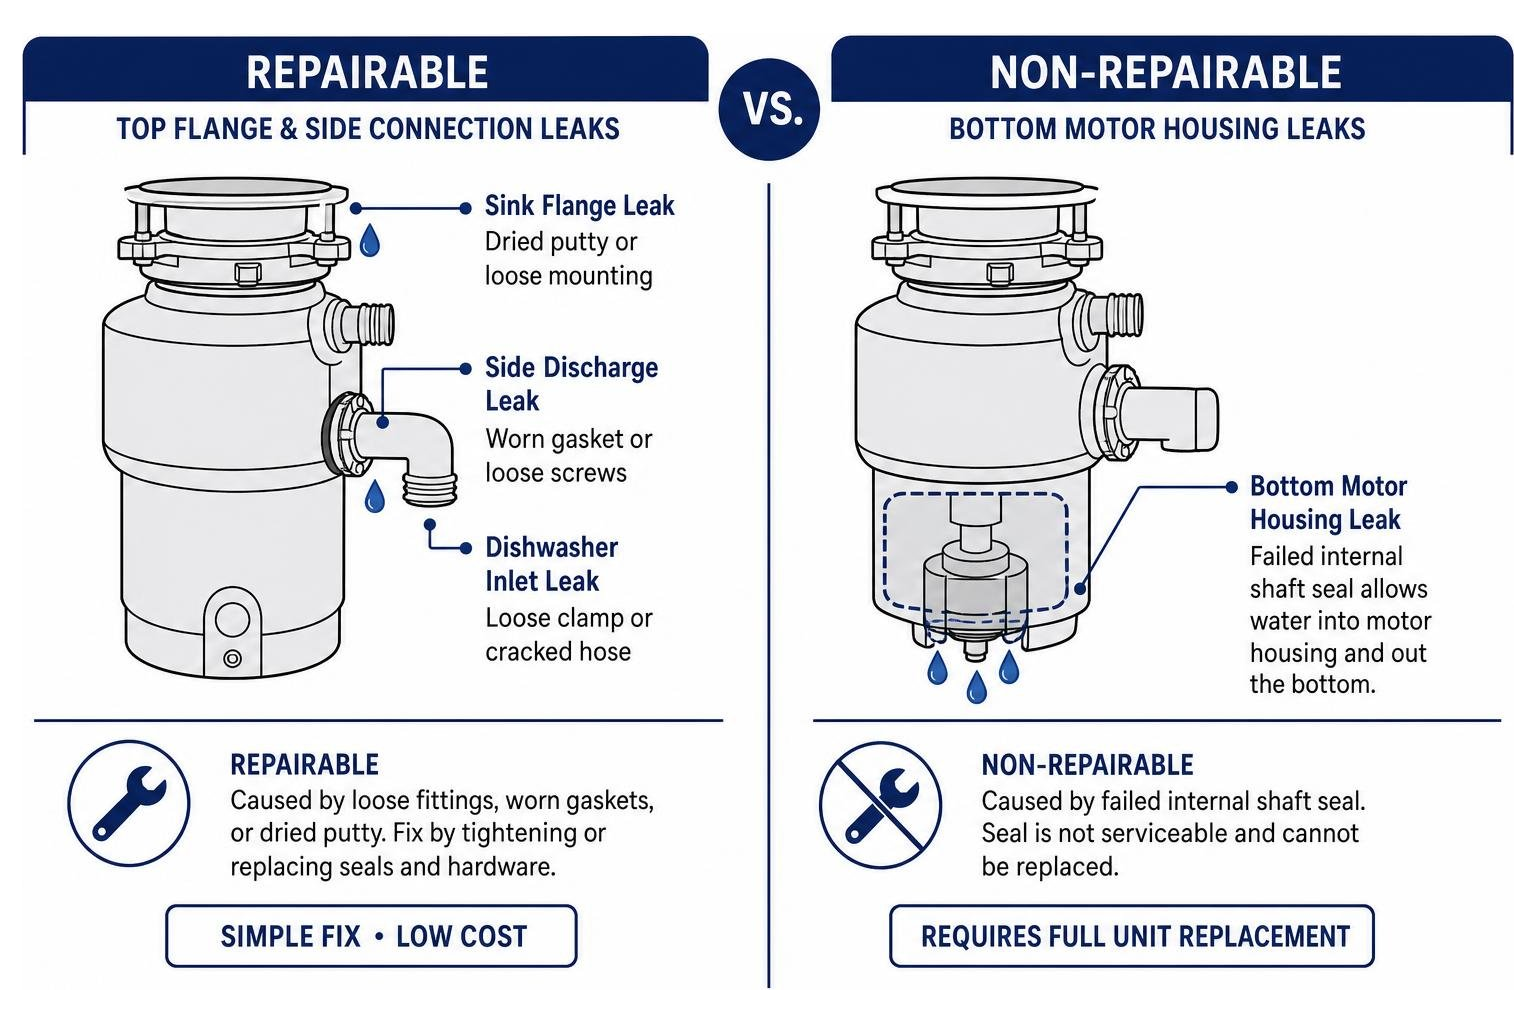
Because this internal shaft seal is factory-pressed into place alongside the balanced flywheel assembly during manufacturing, individual seal replacements are not possible. Attempting to seal the bottom exterior casing with silicone caulk or sealant fails immediately because adhesives cannot withstand heavy motor vibration or greasy water exposure. A bottom leak usually means the safest long-term answer is complete unit replacement.
Repair vs. Replace: Deciding the Best Path Forward
Deciding whether to perform a garbage disposal repair or replace the entire appliance comes down to simple kitchen math: unit age, failure location, and overall mechanical condition.
The average residential unit has an expected service life of 8 to 12 years. Builder-grade models installed in new home constructions often reach the end of their reliability within 5 to 7 years. Additionally, regions with high hard water mineral content can see standard appliance lifespans shortened by 2 to 3 years due to rapid internal corrosion and scale buildup.
| Decision Factor | Repair Is Recommended | Replacement Is Required |
|---|---|---|
| Primary Leak Location | Top sink flange or side drain tube connection | Center bottom motor housing |
| Unit Age | Under 5 to 7 years old | 8 to 12+ years old |
| Operational Sound | Motor hums, which often means a jammed flywheel | Total silence despite electrical power |
| Grinding Performance | Occasional jam from foreign object | Frequent jams during normal soft food disposal |
| Housing Condition | Sound exterior metal casing | Cracked, heavily corroded, or rusted shell |
Key Signs You Need Garbage Disposal Repair
Repair makes practical sense when the unit is relatively young, the motor remains mechanically sound, and the malfunction is restricted to external connections or minor mechanical jams.
Common repairable scenarios include:
- Dislodging jam obstructions using a hex key socket on the bottom of the unit.
- Re-sealing a leaky top sink flange using fresh plumber’s putty.
- Replacing worn rubber discharge gaskets or loose hose clamps.
- Resetting a tripped thermal overload button or replacing an external wall switch.
When Garbage Disposal Repair Is No Longer Practical
Attempting to repair an aged, heavily corroded unit often results in repeated service calls and ongoing water damage risks. Replacement becomes the clear choice when:
- Water leaks directly out of the bottom electrical housing.
- The internal motor is burnt out or permanently seized.
- The grinding chamber is rusted through, allowing food particles to drop into your cabinet.
- The unit jams constantly on basic soft food items due to dull, worn impellers.
DIY Installation Considerations vs. Hiring a Professional
While replacing a unit DIY is common, under-sink installations present unique challenges. Replacing a disposal requires working simultaneously with plumbing lines, high-voltage electrical connections, and watertight sink seals within a cramped cabinet space.
Common DIY installation mistakes include:
- Forgetting to punch out the plastic dishwasher inlet plug inside the new unit before attaching the dishwasher drain hose, leading to immediate dishwasher overflow.
- Incorrectly aligning slip-joint drain pipes, creating persistent slow leaks behind cabinet walls.
- Improperly sealing the sink flange, leading to hidden top-side leaks that rot wooden cabinet subfloors.
If you are weighing your installation options, the Drain Masters blog on DIY versus professional drain clearing can help you think through whether tackling under-sink plumbing yourself or booking a licensed professional best fits your schedule, tools, and comfort level.
Preventive Care: Prohibited Items and Cleaning Maintenance
Preventing unexpected breakdowns starts with adopting smart daily kitchen habits. Garbage disposals are designed to process light residual food scraps off dinner plates; they are not industrial trash compactors meant to consume entire leftover meals at once.
Prohibited Foods and Materials That Cause Severe Clogs
Certain food groups interact poorly with internal grinding components and main drain lines. Keeping these items out of your kitchen sink protects both your unit and your home’s main sewer lateral:
- Fibrous and Stringy Vegetables: Celery stalks, corn husks, artichokes, and asparagus contain long cellulose fibers that wrap tightly around spinning impellers and bind the motor.
- Starchy and Expanding Foods: Potato peels, pasta, rice, and oatmeal absorb water and swell into thick, paste-like masses inside your plumbing trap, creating immediate line blockages.
- Fats, Oils, and Grease (FOG): Warm liquid grease coats interior pipe walls, hardening as it cools into thick sludge that traps food particles and closes off drain pipe openings.
- Coffee Grounds and Eggshells: Eggshell membranes and finely ground coffee do not dissolve. Instead, they break down into abrasive, micro-fine sediment that settles in lower trap turns, creating heavy sand-like clogs.
- Hard Items: Meat bones, fruit pits, seafood shells, metal twist ties, and plastic wrappers will bend impellers, chip grinding teeth, or cause instant mechanical jams.
Kitchen disposal habits affect more than the appliance itself. Grease, starches, and debris can also collect farther down the line, which is why this breakdown of common drain clog sources is useful for spotting everyday habits that lead to slow drains and backups.
If your home uses a septic system, food scraps, grease, and heavy water use can affect more than the disposal and sink trap. The EPA’s septic system care guidance reinforces why homeowners should limit what goes down household drains and avoid sending grease or excess solids into the system.
Routine Cleaning and Long-Term Preventive Habits
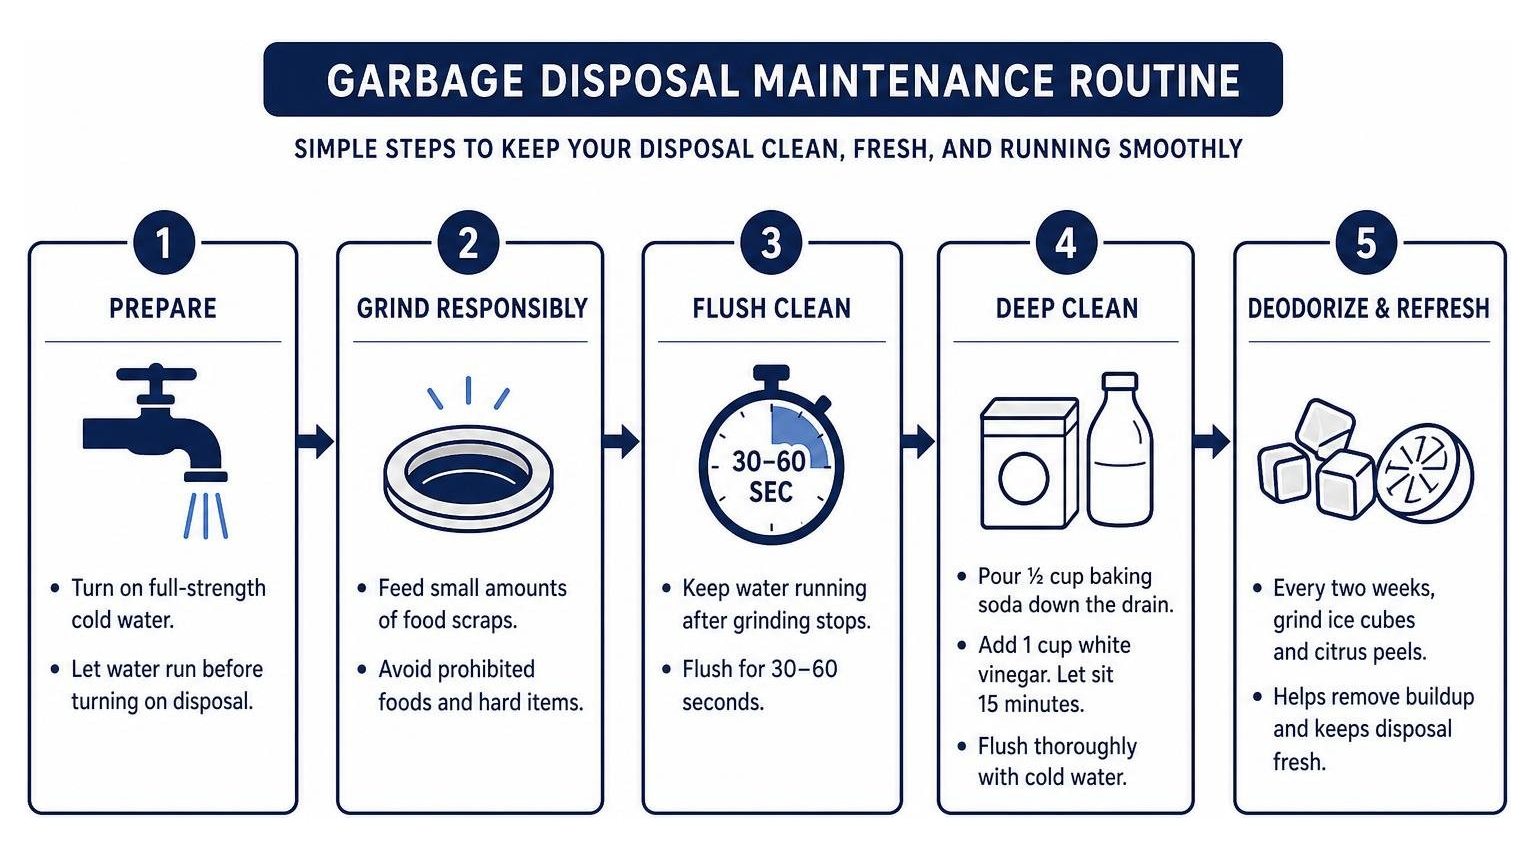
A clean disposal operates smoothly and remains free of foul odors caused by decaying food sludge. Incorporate these basic preventive habits into your weekly kitchen routine:
- Always Run Cold Water: Turn on full-strength cold water before switching on the unit, keep it running throughout the grinding cycle, and allow it to flush for 30 to 60 seconds after grinding stops. Cold water keeps fats solidified so they pass through the pipes cleanly without coating the drain walls.
- Grind Ice Cubes and Citrus Peels: Toss a handful of ice cubes and small lemon or orange peels into the disposal every two weeks. The ice knocks lingering sludge off grinding walls, while natural citrus oils sanitize and deodorize the chamber.
- Baking Soda and Vinegar Flush: Pour half a cup of baking soda down the drain followed by one cup of white vinegar. Allow the natural foaming action to sit for 15 minutes, then flush thoroughly with cold water.
Taking proactive care of your kitchen fixtures goes a long way toward avoiding unexpected plumbing calls. For whole-home support beyond the disposal, routine plumbing maintenance keeps the drainage system, fixtures, and visible plumbing components operating efficiently year-round.
Frequently Asked Questions About Garbage Disposal Care
How do I know if my garbage disposal needs repair or replacement?
If your disposal is under seven years old and suffers from minor issues like a dislodged object jam, loose flange, or worn discharge gasket, a repair is quick and economical. However, if your unit is over eight years old, has water dripping from the bottom housing, continually trips circuit breakers, or experiences complete motor failure, replacement is required.
What are the most common garbage disposal problems and how are they fixed?
The four most common problems are mechanical jams, tripped electrical overload switches, water leaks, and slow draining clogs. Jams are cleared manually using a hex wrench inserted into the bottom center socket. Electrical cut-offs are resolved by pressing the red bottom reset button. Pipe leaks are fixed by replacing gaskets or plumber’s putty, while clogs are cleared using a manual cup plunger.
Why is my garbage disposal leaking from the bottom, and can it be repaired?
A leak coming from the bottom housing indicates that the internal shaft seal separating the upper grinding chamber from the electric motor has failed. Water passing through the motor casing presents an electrical risk and causes irreversible internal corrosion. Bottom housing leaks cannot be repaired and require full appliance replacement.
How much does garbage disposal repair or replacement typically cost?
Overall costs vary depending on whether the unit requires a minor component repair, gasket re-sealing, jam clearing, or full unit replacement. Choosing higher horsepower models, septic-rated units, or requiring electrical upgrades will influence overall project scope.
What should I do if my garbage disposal is humming but not spinning?
Turn off the wall power switch and circuit breaker immediately to prevent motor burnout. Insert a 1/4-inch hex wrench into the manual socket on the bottom of the disposal housing under your sink. Rotate the wrench back and forth until the flywheel rotates freely, then use kitchen tongs to extract the dislodged foreign object from above before resetting power.
What foods and items should I avoid putting down my garbage disposal?
Never put fibrous vegetables such as celery or corn husks, starchy foods like potato peels or rice, grease, oils, coffee grounds, eggshells, meat bones, fruit pits, or non-food materials down your drain. These materials wrap around moving parts, solidify inside pipes, or form heavy sediment clogs.
How do I troubleshoot a garbage disposal that won’t turn on?
First, verify the wall switch is OFF, then check beneath the sink for the red reset button on the bottom of the unit. If it has popped out, press it firmly inward until it clicks. If the unit still does not operate, check your home’s main breaker panel for a tripped circuit breaker or test the GFCI wall outlet.
Can I install a garbage disposal myself, or should I hire a plumber?
While DIY-savvy homeowners can install a unit using standard hand tools, hiring a licensed plumber ensures proper plumbing line alignment, watertight flange sealing, correct dishwasher knockout removal, and safe electrical connections that meet local building codes.
How long does a garbage disposal usually last, and when should it be replaced?
A standard residential unit typically lasts between 8 and 12 years with proper use and routine maintenance. Builder-grade models often fail around 5 to 7 years, and regions with hard water may see shortened lifespans. Replace your unit when it experiences persistent bottom leaks, motor failure, or frequent jams during normal soft food grinding.
How do I unclog a garbage disposal safely without using harsh chemicals?
Avoid chemical drain openers as they corrode internal component seals and create safety risks. Instead, bail out excess standing water, place a cup plunger over the drain opening, and plunge firmly 10 to 12 times to clear line obstructions. For persistent blockages down the line, professional drain cleaning equipment provides safe, thorough clearing.
Conclusion
A malfunctioning garbage disposal quickly disrupts your kitchen routine, but diagnosing the root cause does not have to be overwhelming. By understanding whether you are dealing with a simple flywheel jam, an electrical overload trip, a loose top connection, or an unrepairable bottom shaft seal, you can make informed decisions about your kitchen plumbing system.
Always prioritize safety whenever troubleshooting appliance issues: keep hands out of the drain opening, always isolate electrical power before inspecting components, and avoid chemical drain clearers that damage internal seals. When mechanical fixes or full unit replacements exceed your comfort level, relying on experienced plumbing professionals guarantees your kitchen is restored quickly and safely.
If your kitchen sink is backed up, leaking under the cabinet, or ready for an updated replacement unit, trust the team at Drain Masters for expert help in Anchorage, AK, and contact our professional garbage disposal repair technicians.